Saturday, August 24, 2019

Manage Mule Runtime Using Linux Services On RHEL 7

Introduction

This article describes the procedures to enable Mule runtime as systemd service for Mule standalone runtime clustering on-premises or in private clouds. Since RHEL 7, the systemd init system is a must. The traditional init.d approach is obsolete. For details about the systemd and Unit files, you may refer to this article.

Assumptions

  • Mule standalone runtime is installed at /opt/mule/runtime/current
  • Mule runtime can be started and stoped by the command /opt/mule/runtime/current/bin/mule start | stop
  • mule user has sudo permission

Create Unit File

First, we need to create a file, mule.service at /etc/systemd/system, with the following contents:
# file: /etc/systemd/system/mule.service
# Systemd unit file for mule standalone runtime
[Unit]
Description=Mule Runtime Standalone Runtime
After=syslog.target network.target

[Service]
Type=forking
WorkingDirectory=/opt/mule/runtime/current
Environment=JAVA_HOME=/usr/lib/jvm/java-1.8.0-openjdk-1.8.0.222.b10-0.el7_6.x86_64
Environment=MULE_HOME=/opt/mule/runtime/current
TasksMax=infinity
LimitNOFILE=65335

ExecStart=/opt/mule/runtime/current/bin/mule start
ExecStop=/opt/mule/runtime/current/bin/mule stop

User=mule
Group=mule

RestartSec=10
Restart=always

[Install]
WantedBy=multi-user.target

$ cd /etc/systemd/system/
$ sudo chmod 644 mule.service
$ sudo systemctl daemon-reload
$ sudo systemctl enable mule.service
The above command will enable the mule.service. This procedure simply creates a line in the folder of: /etc/systemd/system/system-update.target.wants
systemd-readahead-drop.service -> /usr/lib/systemd/system/systemd-readahead-drop.service
Now, we are ready to start the mule runtime as a service. To do this, we must first stop the running Mule runtime:
$ cd /opt/mule/runtime/current
$ bin/mule stop
Now, run the following command:
$ sudo systemctl start mule.service
It may take sometime before we get the prompt back. After that we can check whether the mule runtime is running or not by the following command:
$ sudo systemctl status mule.service
● mule.service - Mule Runtime Standalone Runtime
   Loaded: loaded (/etc/systemd/system/mule.service; enabled; vendor preset: disabled)
   Active: active (running) since Sat 2019-08-24 15:46:04 CDT; 2h 45min ago
 Main PID: 17555 (wrapper-linux-x)
   CGroup: /system.slice/mule.service
           ├─17555 /opt/mule/runtime/current/lib/boot/exec/wrapper-linux-x86-64 /opt/mule/runtime/current/conf/wrapper.conf wrapper.s...
           └─17569 /usr/lib/jvm/java-1.8.0-openjdk-1.8.0.222.b10-0.el7_6.x86_64/jre/bin/java -Dmule.home=/opt/mule/runtime/current -D...

Aug 24 15:45:41 wp37mulerte01.aci.awscloud systemd[1]: Starting Mule Runtime Standalone Runtime...
Aug 24 15:45:41 wp37mulerte01.aci.awscloud mule[17439]: MULE_HOME is set to /opt/mule/runtime/current
Aug 24 15:45:41 wp37mulerte01.aci.awscloud mule[17439]: MULE_BASE is set to /opt/mule/runtime/current
Aug 24 15:45:42 wp37mulerte01.aci.awscloud mule[17439]: Starting Mule Enterprise Edition...
Aug 24 15:46:04 wp37mulerte01.aci.awscloud mule[17439]: Waiting for Mule Enterprise Edition.......................
Aug 24 15:46:04 wp37mulerte01.aci.awscloud mule[17439]: running: PID:17555
Aug 24 15:46:04 wp37mulerte01.aci.awscloud systemd[1]: Started Mule Runtime Standalone Runtime.
As you can see, the mule runtime is running. If you want to know the deatils about the mule runtime, you can use the following command:
$ sudo systemctl -l status mule.service
The -l option will print out the arguments passed to the JVM. To view the history of stop/start of the Mule runtime, we can use the following command:
$ sudo journalctl -u mule.service
-- Logs begin at Tue 2019-08-06 23:11:10 CDT, end at Sat 2019-08-24 18:39:13 CDT. --
Aug 22 21:40:03 wd35mulerte01.aci.awscloud systemd[1]: Starting Mule Runtime Standalone Runtime...
Aug 22 21:40:03 wd35mulerte01.aci.awscloud mule[31293]: MULE_HOME is set to /opt/mule/runtime/current
Aug 22 21:40:03 wd35mulerte01.aci.awscloud mule[31293]: MULE_BASE is set to /opt/mule/runtime/current
Aug 22 21:40:05 wd35mulerte01.aci.awscloud systemd[1]: mule.service: control process exited, code=exited status=1
Aug 22 21:40:05 wd35mulerte01.aci.awscloud systemd[1]: Failed to start Mule Runtime Standalone Runtime.
Aug 22 21:40:05 wd35mulerte01.aci.awscloud systemd[1]: Unit mule.service entered failed state.
Aug 22 21:40:05 wd35mulerte01.aci.awscloud systemd[1]: mule.service failed.
Aug 22 21:40:14 wd35mulerte01.aci.awscloud systemd[1]: Stopped Mule Runtime Standalone Runtime.
Aug 22 21:52:39 wd35mulerte01.aci.awscloud systemd[1]: Starting Mule Runtime Standalone Runtime...
Aug 22 21:52:39 wd35mulerte01.aci.awscloud mule[32610]: MULE_HOME is set to /opt/mule/runtime/current
Aug 22 21:52:39 wd35mulerte01.aci.awscloud mule[32610]: MULE_BASE is set to /opt/mule/runtime/current
Aug 22 21:52:40 wd35mulerte01.aci.awscloud mule[32610]: Starting Mule Enterprise Edition...
Aug 22 21:53:03 wd35mulerte01.aci.awscloud mule[32610]: Waiting for Mule Enterprise Edition.........................
Aug 22 21:53:04 wd35mulerte01.aci.awscloud mule[32610]: running: PID:32750
Aug 22 21:53:04 wd35mulerte01.aci.awscloud systemd[1]: Started Mule Runtime Standalone Runtime.
Aug 22 21:54:15 wd35mulerte01.aci.awscloud systemd[1]: Stopping Mule Runtime Standalone Runtime...
Aug 22 21:54:15 wd35mulerte01.aci.awscloud mule[633]: MULE_HOME is set to /opt/mule/runtime/current
Aug 22 21:54:15 wd35mulerte01.aci.awscloud mule[633]: MULE_BASE is set to /opt/mule/runtime/current
Aug 22 21:54:15 wd35mulerte01.aci.awscloud mule[633]: Stopping Mule Enterprise Edition...
Aug 22 21:54:18 wd35mulerte01.aci.awscloud systemd[1]: Stopped Mule Runtime Standalone Runtime.
Aug 22 21:55:43 wd35mulerte01.aci.awscloud systemd[1]: Starting Mule Runtime Standalone Runtime...
Aug 22 21:55:44 wd35mulerte01.aci.awscloud mule[912]: MULE_HOME is set to /opt/mule/runtime/current
Aug 22 21:55:44 wd35mulerte01.aci.awscloud mule[912]: MULE_BASE is set to /opt/mule/runtime/current
Aug 22 21:55:45 wd35mulerte01.aci.awscloud mule[912]: Starting Mule Enterprise Edition...
Aug 22 21:56:08 wd35mulerte01.aci.awscloud mule[912]: Waiting for Mule Enterprise Edition.........................
Aug 22 21:56:08 wd35mulerte01.aci.awscloud mule[912]: running: PID:1091
Aug 22 21:56:08 wd35mulerte01.aci.awscloud systemd[1]: Started Mule Runtime Standalone Runtime.

That is it. It is very helpful to study the commands of systemctl and journalctl.

Sunday, August 18, 2019

Two-Way SSL In Mule Application - Part 2

Introduction

In my previous article in DZone or here, I omitted the procedure to create a trust store for the application. This is important if the applications are deployed to the CloudHub.

In this article, I will describe the procedures to create the trust store and how to configure the HTTPS request for Mule application

Create A Trust Store FOR MULE HTTPS Request

The procedures to import the server's PEM certificate to a trust store are the following.

First, we will create a trust store using the following command:

keytool -genkey -keyalg RSA -alias cyberark-poc -keystore truststore.ks
Enter anything. They are not important as we will delete it.

Second, delete the content of the trust store just created:

keytool -delete -alias cyberark-poc -keystore truststore.ks
Third, import the server's certificate:
keytool -import -v -trustcacerts -alias cyberark-server -file SERVER-CERT.pem -keystore truststore.ks
Now, copy the truststore.ks to Mule application project /src/main/resources

HTTPS Request Configuration

The following is the complete HTTPS Request configuration:


Note: I put both client.pfx and truststore in the directory of /src/main/resources. You may put them into different directory. In that case, you need to give the full path relative to the Mule Application Project, such as ssh/cert/client.pfx.

The Key Takeaways

The best practice for certificates manipulation is:
  1. If the deployment is on-prem, import servers' certificates to cacert. In this way if the server's certificate is expired, we just need to reimport, not code change is required.
  2. If the deployment is CloudHub, we have to import the servers' certificate to a truststore as described in this article.
  3. Use JKS format for the trust store used in the HTTPS request. It is most popular one.

Sunday, August 11, 2019

Two-Way SSL In Mule Application

Introduction

In my previous article, I have explained how Two-Way SSL works with the context of Mule Application. Many people have asked the question about how to setup HTTPS request in Mule application. This article provide the details about the procedures to invoke HTTPS services which require Two-Way SSL or Mutual Authentication. Before we dive into the detail procedures, lets review how Two-Way SLL works between clients and servers.

The gist of Two-Way SSL is to exchange certificates between clients and servers. The details are pretty complicated and they beyond the scope of this article. Basically, here are the high level scheme of the exchange of certificates:
  1. Client send a ClientHello message to a server
  2. Server replies with ServerHello, Server's certificate, and Request for Client's certificate
  3. Client its certificate other information like cipher scheme, server's certificate verification, etc.
  4. Server replies with cipher scheme.
  5. Start to exchange information
Now, how do we setup Mule Application as client?

Client's Certificate Generation

In general, IT admin will generate client certificates similar as I describe in my blog here Let's assume that is the way for now so that we can describe how to setup Mule HTTPS Request. Before we continue, we need to obtain server's certificate in advance. The certificate can be in many forms like JKS, PKCS12, PEM, etc. Mule HTTPS request support three forms:
  • JKS
  • PKCS12
  • JCEKS
Let's say if we got PEM format from the server. We need to do one of the two things depending on the deployment pattern.
  • if it is on-prem deployment, the best way is to import the cert to JVM cacerts
  • if it is deployed to MuleSoft CloudHub, we need to convert the PEM to PKCS12.
If it is on-prem deplopment, we can import the the PEM certificate directly into cacerts here is the procedure (Make sure you have sudo permission, and server's cert is named like SERVER_CERT.pem)
cd ${JAVA_HOME}/jre/lib/security
cp SERVER_CERT.pem
sudo keytool -import -alias mule1-cyberark -keystore cacerts -file SERVER_CERT.pem
To be sure that server's cert is in pem format, you can use the following command:
$ openssl x509 -in SERVER_CERT.pem -text
If it is CloudHub deployment, we need to convert the pem file to PKCS12 format. Here is the command:
$ openssl pkcs12 -export -nokeys -in SERVER_CERT.pem -out SERVER_CERT.pfx

Note the option of "-nokeys". This means I do not have the private key of the certificate. Now we have server's certificates being taken care of. We need to convert the client's certificate to PKCS12. Here is the command to do so:

 openssl pkcs12 -export -in cacert.pem -inkey cakey.pem -out identity.p12 -name "mykey"

Note the above procedure will ask the password. Make sure you remember it.

Setup Mule Flow

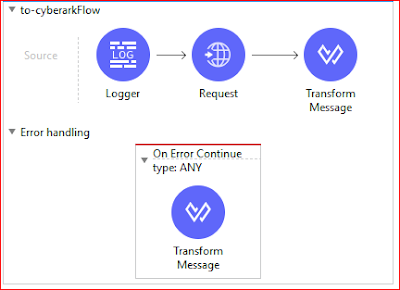
The following diagram shows the simple Mule flow
The https request configuration is the following:


The import point here is that client's certificate is

and server's certificates is

Friday, August 9, 2019

How To Pass MuleSoft Certified Developer - Level 1 (Mule 4)

Congratulation Gary!

First of all, I must congratulate myself for getting this done. For almost a year, I have been thinking to take the exam, but my project schedules have been crazy. I hardly find time to prepare the certification. Three weeks ago, I decided to give a shot. I studied two weekends, and spend about 1 hour each day. And today, I did! I must say that I feel it is a kind of accomplishment. This test is not easy!
Here I will try to summarized my feeling about the test and how I prepared the test. Hopefully, it will provided some help to those who are thinking to take the test.

The Procedures

First of all, go to Mule training website and paid 250 USD online and schedule a test at the same time. I did my test at my local test center. There, I have to lock away my cell phone, watch, wallet, even my hat! It is very quiet and comfortable place. Not many people there either.

The exam is 2 hours long. That is plenty time to ponder each question carefully. At the first 10 minutes, MuleSoft did a survey about my experience in Mule, how I prepared the test, what role I play, etc. I am not sure why they should ask these questions at all. One thing really makes me suspicious is that if you are a very experience developer, you may get harder questions. It is just my guess!

How Was My Test Results?

It took me 88 minutes to submit the answer. I know I had plenty time, so that I read each question very carefully and did not plan to review them once I am done with all the questions.

The following are the results I got:

Creating Application Networks: 100.00%

Designing APIs: 100.00%

Building API Implementation Interfaces: 100.00%

Deploying and Managing APIs and Integrations: 75.00%

Accessing and Modifying Mule Events: 83.33%

Structuring Mule Applications: 66.66%

Routing Events: 80.00%

Handling Errors: 80.00%

Troubleshooting and Testing Mule Applications: 66.66%

Writing DataWeave Transformations: 100.00%

Using Connectors: 83.33%

Processing Records: 100.00%

Result: PASS
Roughly, my overall score is about 89%. I think I did pretty OK given that I did not have enough time to prepare. I have no idea why my trouble shooting score is only 66.66%. I thought this is my strongest area.

How Do I Feel About The Questions?

Overall, I think the questions are very good, but many of them are very hard to answer with confidence. About 15% of the questions are really hard.

The challenges come from several fronts. Firstly, most of the questions are very long. You must read the question at least two times before you answer the question. This really tests your English as the questions are very tricky. Secondly, most questions are really difficult to 100% sure from the first glance. You have to read them very carefully. Sometimes the brackets, comma, and semicolon make the difference. Thirdly, some questions are rare to encounter in real life, such as exporting artifacts from Anypoint Studio. We normally don't do this. All in all, I think MuleSoft training department did a good job. It seems the Mule 4 MCD is a bit harder the Mule 3 one.

How I Prepared My Test

I really don't have the time to go through all the training materials. Definitely no time to go through all the DIY.

Here is the procedure I took. I think if you are experience developer and want to pass the test at the first shot. You can follow my way.

  1. Go to the final Quiz at the last Module of the training material, and try to answer them. They are pretty difficult actually. Many of them, I really had trouble to answer at the first time. The good news is that for each question, if you did not answer correctly, the website tell you the right answer. Thus you can figure out why.
  2. Quickly go through each chapter and all the slides. Notes down what the chapter is about.
  3. After the first two steps, I start to create many mini-code to really understand the details about connectors, error handling, different scopes, etc.
  4. Take notes. Take a lot of notes. These notes really help me to remember the nitty-mitty details. Remember, to pass the test, you must pay attention to tiny details.

Some Thoughts About The Certification

Definitely, it worths the time and energy to prepare and take the Exam. It really lets us to start paying attention to details and try to think about the reason about the way MuleSoft implements connectors, design patterns, and other systems. It is not for beginner anyway.

Don't take the delta test. To me, it is really better to challenge ourselves and take Mule 4 MCD.

The questions have a lot of room to improve.

  • It should really focus on how our daily development works.
  • Questions should more focus on development of Mule flows, less memorization of syntaxes.
  • More questions on design and troubleshooting.
  • More questions on problem solving skills.

Tuesday, August 6, 2019

Mule 4: Enable HTTPS Connector Using openssl

Introduction

This article demonstrate the procedures using openssl to generate self-signed certificates, and how to use the private key to configure HTTPS connector.

Generate Private Key And Public Cert Using openssl

$ openssl req -newkey rsa:2048 -x509 -keyout cakey.pem -out cacert.pem -days 3650
Generating a RSA private key
....+++++
...................................................+++++
writing new private key to 'cakey.pem'
Enter PEM pass phrase:
Verifying - Enter PEM pass phrase:
-----
You are about to be asked to enter information that will be incorporated
into your certificate request.
What you are about to enter is what is called a Distinguished Name or a DN.
There are quite a few fields but you can leave some blank
For some fields there will be a default value,
If you enter '.', the field will be left blank.
-----
Country Name (2 letter code) [XX]:US
State or Province Name (full name) []:Texas
Locality Name (eg, city) [Default City]:Dallas
Organization Name (eg, company) [Default Company Ltd]:GGL Consulting Inc
Organizational Unit Name (eg, section) []:EA
Common Name (eg, your name or your server's hostname) []:Gary Liu
Email Address []:gary.liu1119@gmail.com
The above command will generate two files:
  1. cakey.pem
  2. cacert.pem
Mulesoft HTTPS TLS configuration support 3 format:
  1. JKS -- Java Keystore
  2. PKCS12 -- for details refer this page
  3. JCEKS -- Stands for Java Cryptography Extension KeyStore
We need to convert the RAS format to PKCS12 using the following command:
$ openssl pkcs12 -export -in cacert.pem -inkey cakey.pem -out identity.p12 -name "mykey"
Enter pass phrase for cakey.pem:
Enter Export Password:
Verifying - Enter Export Password:
The above command generate a file namely: identity.p12 with the alias mykey. Now we can configure the HTTPS Connector.

Configure HTTPS Connector

The xml configuration will be like the following:


The follow snapshots show the procedures using Anypoint Studio:

Invoke The Service

To test the service we can use the following curl command:
$ curl -k -XGET https://localhost/helloworld
  % Total    % Received % Xferd  Average Speed   Time    Time     Time  Current
                                 Dload  Upload   Total   Spent    Left  Speed
100    31  100    31    0     0     31      0  0:00:01  0:00:01 --:--:--    29
{
  "message": "Hello, World"
}
Note -k option is to tell curl to accepted self-signed certificates.

Sunday, August 4, 2019

Dataweave Tricks: Extract Keys and Values From HashMap

Introduction

I have a requirement to extract the keys and values from a dataset like the following:
{
  "account1" : {
      "accountID" : "1234",
      "name" : "Mary Loo",
      "balance" : 234.32
     },
  "account2" : {
      "accountID" : "1234",
      "name" : "Lauren Flor",
      "balance" : 234.32
     },
  "account3" : {
      "accountID" : "1234",
      "name" : "Mary Loo",
      "balance" : 234.32
     }         
}
Apparently, the above data is a Map. Now we need to produce two dataset of values and keys from the input (Map) as the following:
[
    {
        "accountID": "1234",
        "name": "Mary Loo",
        "balance": 234.32
    },
    {
        "accountID": "1234",
        "name": "Lauren Flor",
        "balance": 234.32
    },
    {
        "accountID": "1234",
        "name": "Mary Loo",
        "balance": 234.32
    }
]
and
[
    "account1",
    "account2",
    "account3"
]

Understanding Dataweave pluck Function

Dataweave has devised a function particularly for this kind of requirement. Here is the solution to extract values of a HashMap
%dw 2.0
output application/json
---
payload pluck (item, key, index) -> item
The shorthand version:
%dw 2.0
output application/json
---
payload pluck $
And to extract the keys:
%dw 2.0
output application/json
---
payload pluck (item, key, index) -> key
The shorthand version:
%dw 2.0
output application/json
---
payload pluck $$

Saturday, August 3, 2019

Dataweave 2.0 Tricks: Sorting and Grouping

The Challenges

I have Accounts retrieved from Salesforce like the following:

[
    {
        "LastModifiedDate": "2015-12-09T21:29:01.000Z",
        "Id": "0016100000Kngh3AAB",
        "type": "Account",
        "Name": "AAA Inc."
    },
    {
        "LastModifiedDate": "2015-12-09T20:16:47.000Z",
        "Id": "0016100000KnXKhAAN",
        "type": "Account",
        "Name": "AAA Inc."
    },
    {
        "LastModifiedDate": "2015-12-12T02:06:48.000Z",
        "Id": "0016100000KqonvAAB",
        "type": "Account",
        "Name": "AAA Inc."
    },
...
]
The dataset contains many accounts which have the same name. These accounts with the same account are regarded as duplicates Eventually I want to delete the duplicates and just leave one in the SFDC. Before I delete the duplicates, I need to create an output for review like the following:
{
    "AAA Inc.": [
        "0016100000Kngh3AAB",
        "0016100000KnXKhAAN",
        "0016100000KqonvAAB",
        "0016100000KnggyAAB",
        "0016100000KngflAAB",
        "0016100000KqalVAAR",
        "0016100000Kngh8AAB",
        "0016100000KnVUKAA3",
        "0016100000Kngh5AAB",
        "0016100000KnVXdAAN",
        "0016100000KnVh4AAF",
        "0016100000KnVs6AAF",
        "0016100000KnggAAAR",
        "0016100000KnlokAAB",
        "0016100000KnggKAAR"
    ],
    "Adam Smith": [
        "0016100000L7sDjAAJ"
    ],
    "Alice John Smith": [
        "0016100000L7x29AAB"
    ],
    "Alice Smith.": [
        "0016100000L7sDiAAJ"
    ],
...

Solutions

I device a two-stage solution. The first transform will create LinkedHashMap which will contain account name as key and the value as array of Account as shown below:
%dw 2.0
output application/java
---
//payload groupBy $.Name orderBy $$
(payload groupBy (account) -> account.Name)  orderBy (item, key) -> key
The second stage of transformation is to extract the account ID as the following:
%dw 2.0
output application/java
---
payload mapObject (item, key, index) -> {  
 (key) : (item map (value) -> value.Id)  
}
Of course, I can put the two Dataweave scripts into one like the following:
%dw 2.0
output application/java
---
//payload groupBy $.Name orderBy $$
((payload groupBy (account) -> account.Name)  orderBy (item, key) -> key)
mapObject (item, key, index) -> {  
 (key) : (item map (value) -> value.Id)  
}

Key Learnings

The key concept of the above use case is to group the accounts with the same name and sort them in alphabetic order. The Mulesoft document about the groupBy and orderBy together with other core functions of dataweave can be found here The groupBy and orderBy have the similar signature:

1. groupBy(Array, (item: T, index: Number) -> R): { (R): Array }
2. groupBy({ (K)?: V }, (value: V, key: K) -> R): { (R): { (K)?: V } }
3. groupBy(Null, (Nothing, Nothing) -> Any): Null
The first function indicates that it can take array as input. The usage will like the following:
//payload groupBy $.Name
//payload groupBy (account, index) -> account.Name
payload groupBy (account) -> account.Name
The above code are the same. The first one is a short-cut version. The second and third lines are to show the lambda style. As a good developer, you should know all the syntax.

In my solution of the second stage, I use mapObject function as the following:

payload mapObject (item, key, index) -> {  
 (key) : (item map (value) -> value.Id)  
}
This is because the payload is a LinkedHashMap and the value of each HashMap entry is an array. That is why I have to use map function inside the mapObject function.

In my work, I also need to remove the type attribute in the Account object.

[
    {
        "LastModifiedDate": "2015-12-09T21:29:01.000Z",
        "Id": "0016100000Kngh3AAB",
        "type": "Account",
        "Name": "AAA Inc."
    },
...
]
Here is the transform to remove the type:
(payload orderBy (item) -> item.Name) map (account) -> {
 (account -- ['type'])
}
As you can see I have used function of --.

Summary

The key thinking of solve this kind of problem how to group, sort, and extract values from the Array or LinkedHashMap. Thus I have used the following core Dataweave functions:
  • groupBy
  • orderBy
  • map
  • mapObject
Also, we should know the short-hand way and Lambda style for using the Dataweave functions. The short-hand way is to use build-in variable $, $$, $$$.
If the payload is Array
  • $ - item
  • $$ - index
If the payload is LinkedHashMap
  • $ - value
  • $$ - key
  • $$$ - index.
The Lambda style is like the following:
(payload orderBy (item) -> item.Name) map (account, index) -> {
 (account -- ['type'])
}
mapObject (item, key, index) -> {  
 (key) : (item map (value) -> value.Id)  
}

Mule Application Hacking: Reveal Details Of A Connector's Connection

Introduction

In my last hacking post, I described the method to view the source code of Mule connectors using the ECD. In this article, I am go demonstrate the procedure to reveal the details about connection and communication within the Mule Connector. This is very useful for the purpose of trouble-shooting.

I will use Salesforce connector as example to demonstrate how to read connection details, query, etc.

Details

First, looking for the connector as shown in the following snapshots:
As you can see, I have added Salesforce connection version 9.7.7. Now, we need to expand the connector. Then looking for mule-salesforce-connector-9.7.7-mule-pluging.jar and expand the jar file as shown below:
Now we can see that the java class packages all under org.mule.extension.salesforce.

The next step is to add the package to log4j.xml in the dir of src/main/resources as shown below:

Now add the package of org.mule.extension.salesforce into the Loggers section of the log4j.xml file as shown below


Now, if you run the project, the console will deplay the debugging information about the connection information, request, and response from Salesforce connectors.

Anypoint Studio Error: The project is missing Munit lIbrary to run tests

Anypoint Studio 7.9 has a bug. Even if we following the article: https://help.mulesoft.com/s/article/The-project-is-missing-MUnit-libraries-...