Friday, December 2, 2016

Test Two-Way-SSL Using Postman

Introduction

This short post explains how to test two-way-ssl using postman. The same principle applies to SoapUI. For details about how to create two-way-ssl service will be explained in later post.

Assumption

  1. You have client.keystore.jks and client.truststore.jks.
  2. You have tested both file using restclient

JKS To PCS12

keytool -importkeystore 
     -srckeystore client.keystore.jks 
     -destkeystore client.p12 
     -srcstoretype JKS 
     -deststoretype PKCS12 
     -deststorepass clientpass 
     -srcstorepass clientpass 
     -srcalias mule-client 
     -destalias mule-client

Import client.p12 To KeyChain

Open KeyChain Access (MacOs)
File -> Import Items
Now Search for the alis "mule-client"

Test Using Postman

In my case, I use this url for two ssl: https://localhost:8543/twoway. When I send a POST request, postman will as certificates to send to the server as the following: Choose "localhost" one.

Test Using curl

Local Host Test


URL: https://localhost:8543/twoway

curl -k --cert client.p12:clientpass \
     -X POST -H "Content-Type: application/json" \
     -d '{"name": "Gary Liu"}' \
      https://localhost:8543/twoway

Test For CloudHub

CloudHub behave different for two-ssl. The port will be 8082, regardless what you set in the file of mule.dev.properties
URL: https://mule-worker-twowayssl-poc.cloudhub.io:8082/twoway
curl -k --cert client.p12:clientpass \
     -X POST -H "Content-Type: application/json" \
     -d '{"name": "Gary Liu"}' \
     https://mule-worker-twowayssl-poc.cloudhub.io:8082/twoway

Monday, August 29, 2016

Enable Custom TLS Configuration For Mule Project

Introduction

This arctile is to describe how to load custom TLS/SSL configuration.

MuleSoft Runtime comes with default tls configuration, namely tls-default.conf. Actually, there are 3 locations:

./AnypointStudio.app/Contents/Eclipse/plugins/org.mule.tooling.server.3.8.0.ee_6.0.0.201605131244/mule/conf/tls-default.conf
./AnypointStudio.app-not-working/Contents/Eclipse/plugins/org.mule.tooling.apigateway.2.2.0_2.2.0.201603300158/mule/conf/tls-default.conf
./AnypointStudio.app-not-working/Contents/Eclipse/plugins/org.mule.tooling.server.3.8.0.ee_6.0.0.201605131244/mule/conf/tls-default.conf

In those files, there is a line line:

enabledProtocols=TLSv1.1,TLSv1.2

In the local or on-premise environment, we can change this file for our purpose, such as, to allow TLSV1. In the CloudHub, we have not control to this file. The solution is to create custom tls configuration file.

Solution

First, add the following line to the mule-app.properties
mule.security.model=custom
Second, create a file, named tls-custom.conf with the content as the following (you can add additional information, this is just an example):

# This file allows to restrict SSL behavior in Mule. If the file doesn't exist or a property is not defined,
# default values of the current security provider will be used.


# Cipher suites that will be enabled in SSL. If this property is set, SSL sockets will
# only use cipher suites that are provided in this list and supported by the current security provider.
#enabledCipherSuites=TLS_KRB5_WITH_3DES_EDE_CBC_MD5,        \
#                    TLS_KRB5_WITH_RC4_128_SHA,             \
#                    SSL_DH_anon_WITH_DES_CBC_SHA,          \
#                    TLS_DH_anon_WITH_AES_128_CBC_SHA,      \
#                    TLS_DHE_RSA_WITH_AES_128_CBC_SHA,      \
#                    SSL_DHE_RSA_EXPORT_WITH_DES40_CBC_SHA, \
#                    SSL_RSA_EXPORT_WITH_RC4_40_MD5,        \
#                    SSL_DHE_RSA_WITH_3DES_EDE_CBC_SHA,     \
#                    TLS_DHE_RSA_WITH_AES_256_CBC_SHA,      \
#                    TLS_KRB5_WITH_3DES_EDE_CBC_SHA,        \
#                    SSL_RSA_WITH_RC4_128_SHA,              \
#                    TLS_KRB5_WITH_DES_CBC_MD5,             \
#                    TLS_KRB5_EXPORT_WITH_RC4_40_MD5,       \
#                    TLS_KRB5_EXPORT_WITH_DES_CBC_40_MD5,   \
#                    SSL_DHE_DSS_EXPORT_WITH_DES40_CBC_SHA, \
#                    TLS_KRB5_EXPORT_WITH_RC4_40_SHA,       \
#                    SSL_DH_anon_EXPORT_WITH_RC4_40_MD5,    \
#                    SSL_DHE_DSS_WITH_DES_CBC_SHA,          \
#                    TLS_KRB5_WITH_DES_CBC_SHA,             \
#                    SSL_RSA_WITH_NULL_MD5,                 \
#                    TLS_DHE_DSS_WITH_AES_256_CBC_SHA,      \
#                    SSL_DH_anon_WITH_3DES_EDE_CBC_SHA,     \
#                    TLS_RSA_WITH_AES_128_CBC_SHA,          \
#                    SSL_DHE_RSA_WITH_DES_CBC_SHA,          \
#                    TLS_DH_anon_WITH_AES_256_CBC_SHA,      \
#                    TLS_KRB5_EXPORT_WITH_DES_CBC_40_SHA,   \
#                    SSL_DH_anon_EXPORT_WITH_DES40_CBC_SHA, \
#                    SSL_RSA_WITH_NULL_SHA,                 \
#                    TLS_KRB5_WITH_RC4_128_MD5,             \
#                    TLS_RSA_WITH_AES_256_CBC_SHA,          \
#                    SSL_RSA_WITH_DES_CBC_SHA,              \
#                    TLS_EMPTY_RENEGOTIATION_INFO_SCSV,     \
#                    SSL_RSA_EXPORT_WITH_DES40_CBC_SHA,     \
#                    SSL_DH_anon_WITH_RC4_128_MD5,          \
#                    SSL_RSA_WITH_RC4_128_MD5,              \
#                    TLS_DHE_DSS_WITH_AES_128_CBC_SHA,      \
#                    SSL_DHE_DSS_WITH_3DES_EDE_CBC_SHA,     \
#                    SSL_RSA_WITH_3DES_EDE_CBC_SHA


# Protocols that will be enabled in SSL. If this property is set, SSL sockets will only use protocols
# that are provided in this list and supported by the current security provider.
enabledProtocols=TLSv1,TLSv1.1,TLSv1.2

Test It

Run your application in the anypoint studio. In the console, you should see the following:
INFO  2016-09-22 15:51:18,443 [main] org.mule.api.security.tls.TlsProperties: Loading configuration file: tls-custom.conf
INFO  2016-09-22 15:51:18,593 [main] org.mule.api.security.tls.TlsProperties: Loading configuration file: tls-custom.conf
INFO  2016-09-22 15:51:18,613 [main] org.mule.api.security.tls.TlsProperties: Loading configuration file: tls-custom.conf

Saturday, April 30, 2016

MuleSoft Dataweave Tutorial Part IV: Using mapObject, pluck, function

Introduction

DataWeave comes with map, mapOjbect, pluck, and other build in functions. The map function is mostly used in the message transformation. There are a lot of other functions provided by the Dataweave component, such as split, trim, uppercase, lower case, etc.

This tutorial is an example on how to use map, mapObject, plunk, and joinBy functions to achieve a fairly complicated message transformation.

Use Cases

Input Data


         venkat
         api-user-jwilson
         4JuGSrVb1E7k8a1datKuGV0fqma58c2B
         VC84632147254611111111
         5000
         
            John Smith
            12 Main St
            Raheja
            30301
            Denver
            CO
            USA
            6099026676
            gg@gmail.com
            10.121.123.112
         
         
            John Smith
            12 Main St
            SR Nagar
            30301
            Denver
            CO
            USA
         
         
            111
            false
            V12345
            MOTO
            true
            true
            H
            3000
            1000
            false
            
               
                  1
                  1
                  T1234522
                  100
                  localsales
                  A10004
                  AA01
                  100
                  400
                  300
               
               
                  02
                  1
                  120
                  120
                  30
                  t-shirt
                  each
                  300
                  0001
               
                
                  001
                  1
                  120
                  120
                  30
                  t-shirt
                  each
                  300
                  0001


Output

{
  "result": "(productcode=02;quantity=1;price=120;tax=120;discount=30;productdescription=t-shirt;unitofmeasure=each;taxamount=300;taxidentifier=0001)(productcode=001;quantity=1;price=120;tax=120;discount=30;productdescription=t-shirt;unitofmeasure=each;taxamount=300;taxidentifier=0001)"
}

We need to create key-value pairs for level-e-field. Each key-value pair is separated by semi-colon, and each object is demarked by round braket. (key1=value1;key2=value2;...;keyN=valueN)().

The Solution

%dw 1.0
%output application/json
%function enrich(val) '(' ++ val ++ ')' 
---
result: payload.Envelope.Body.preauth.optional-info.level-2-3-fields.*level-3-field
map ((value,index) -> (
      value mapObject ((oValue, oKey) -> { 
          '$oKey': oKey ++ '=' ++ oValue        
      }) pluck $ joinBy ';'
)) 
map ((val, key) -> enrich(val)) joinBy ''

The first code line 5 is easy to understand. We need to access the xml object at level-3-file. The only trick we need to know is that we need to add a star *. As we have multiple level-3-field object, we need to use map. map function is just a look. It takes two parameters. The first is value of the object, and the second is the index. If you have an array or list, you can think the first is the value of the array and the second is the index, which starts with 0 as java array.

In our code, we use twice joinBy function. The first joins the array with ';' semi-colon. The second join the level-3-field objects together.

pluck is another function which create an array of keys or values. The value is $, and the keys are $$.

Sunday, April 17, 2016

MuleSoft Dataweave Tutorial: Part III - Multiple Level Iteration of Arrays

Introduction

I must admit the MuelSoft's Dataweave component is a critical and very powerful component of the Mule application development, because the data transformation is one of the critical part of enterprise integration. In this short article, I am going to explain the usage of multiple level of mapping.

The build-in function map is used to iterate a list of objects. This is mostly used function with Dataweave component. Given that, let explain my use cases.

Use Cases

Here is the input:
[
  {
    "TX": [
      {
        "name": "John Smith"
      },
      {
        "name": "Robert Goll"
      }
    ]
  },
  {
    "OK": [
      {
        "name": "Framk Chambers"
      },
      {
        "name": "Billie Chambers"
      }
    ]
  }
]
The output should be [Note: this is just a simple example to illustrate the concept]:
[
  {
    "name": "John Smith"
  },
  {
    "name": "Robert Goll"
  },
  {
    "name": "Framk Chambers"
  },
  {
    "name": "Billie Chambers"
  }
]

Logical Thinking

If we looking the input, we can see that this is List of List. There are 2 levels. Somehow, if we can create an array of array like this:

[
   [
   ],
   [
   ]
]

then, we can use the build-in function: flatten, to get the result we want. To achieve this, we need to replace the middle keys like "TX", "OK" to a same name, tempName. This can be achieved by the following code:

payload map {
     ($ map tempName: $)
 }

The result of the above code produces the following result:

[
  {
    "tempName": [
      {
        "name": "John Smith"
      },
      {
        "name": "Robert Goll"
      }
    ]
  },
  {
    "tempName": [
      {
        "name": "Framk Chambers"
      },
      {
        "name": "Billie Chambers"
      }
    ]
  }
]

Here the outer loop (map) is easy to understand, but inner loop ($ map tempName: $) is a bit difficult. The dataweave component ignore the key "TX" and loop the inner array.

if we understand the inner loop, the problem should be easily understood now.

The Solution One: Using Temporary Variable

%dw 1.0
%output application/json
---

 flatten (payload map {
     ($ map tempName: $)
 }).tempName

The Solution Two: Using reduce function

Another more elegant solution is to use reduce function.

%dw 1.0
%output application/json
---

payload reduce ((value, acc = {}) -> acc ++ value[0])
 

Key Learning

In this exercise, we learn the key concept of map for inner array. In order to flatten the inner array of objects, we have to replace the keys of the inner array with a temporary name, then use the temporary name to get the connects, and further, flatten the array.

Apparently, the build-in function "flatten" is a recursive function. Now, a question comes: can we recursively map the multiple levels of array?

Saturday, April 16, 2016

MuleSoft Dataweave Tutorial: Part II - Functions

User Defined Functions

Here is a example from Mule document:
%dw 1.0
%output application/json
%function toUser(user) { firstName: user.givenName, lastName: user.sn }
---
{
  "user" : toUser({ givenName : "Annie", sn : "Point" })
}
Output from the result:
{
  "user": {
    "firstName": "Annie",
    "lastName": "Point"
  }
}

Mule document did not provide much explanation. What does this function do?

 %function toUser(user) { firstName: user.givenName, lastName: user.sn }
First, we can see it declares the user object, which has {givenName, sn}. When we use the function in the body, we parse an object of user in the form of:
 toUser({ givenName : "Annie", sn : "Point" }) 
Where
 { givenName : "Annie", sn : "Point" } 
is an user object. This tell us how you can initialize an object and pass to a function.

Using Build-in Function: GroupBy

If we want to group object by attribute, we can groupBy and pluck together. Here is the simple Dataweave code:

%dw 1.0
%output application/json
---
payload groupBy $.state

Here is the input data:
[
 {
  "name": "John Smith",
  "street": "1234 JS Ln",
  "city": "Allen",
  "state": "TX",
  "zip": "75123" 
 },
 {
  "name": "Framk Chambers",
  "street": "1234  Colleage Rd",
  "city": "Stillwater",
  "state": "OK",
  "zip": "73001" 
 },
 {
  "name": "Robert Goll",
  "street": "1234 Bush Dr",
  "city": "Plano",
  "state": "TX",
  "zip": "75127" 
 },
  {
  "name": "Billie Chambers",
  "street": "1234 College Rd",
  "city": "Stillwater",
  "state": "OK",
  "zip": "73001" 
 }
]
And here is the output:
[
  {
    "name": "John Smith"
  },
  {
    "name": "Robert Goll"
  },
  {
    "name": "Framk Chambers"
  },
  {
    "name": "Billie Chambers"
  }
]

Monday, April 11, 2016

MuleSoft Dataweave Tutorial: Part I - JSON To XML Example

Use Case One

Input

{
    "medication": {
        "name": "Natrecor"
    },
    "genericequivalents": [
        {
            "name": "Narecor",
            "label": "Erlotinib2"
        }
    ]
}

DW Code

%dw 1.0
%output application/xml
---
response: {
 medication : payload.medication, 
 genericequivalents: { 
  (payload.genericequivalents map {
    names : {
     label: $.label,
     name: $.name 
    }
  }) 
 } 
} 

Use Case Two

Input

{
    "medication": "praxel",
    "genericequivalents": {
        "name": [
            "Praxe",
            "Praxedes",
            "Paxel",
            "Pragel",
            "Fraxel",
            "Parexel"
        ]
    }
}

DW Code


%dw 1.0
%output application/xml
---
{
 response: {
  medication: payload.medication,
  genericequivalents: {
   (payload.genericequivalents.name map ((name , indexOfName) -> {
    name: name
   }))
  }
 }
}

Output


   praxel
   
      Praxe
      Praxedes
      Paxel
      Pragel
      Fraxel
      Parexel
   

Wednesday, March 30, 2016

Build Dynamic Query

Use Cases

The following is a code example on how to use Lambda express to build dynamic query the where clause. Here is the use cases:

  • client provide a set of query parameters in JSON format or XML format
  • Mule flow will transform the request payload to java LinkedHashMap
  • We need to write custom transformer to build the database query's where clause
  • In the custom transformer, we need to filter the entries with null or empty string value
  • The transform should return the string in the format of:
        ID='1243124' and Name='John Smith'
       

Code Example

package com.ggl.util;

import java.util.HashMap;
import java.util.LinkedHashMap;

public class DynamicQueryBuilder {
 public static void main(String[] argv) {
  System.out.println("--> Build HashMap Now! <--");
  HashMap source = new LinkedHashMap<>();
  source.put("ID", "123456789");
  source.put("NAME", "Gary Liu");
  source.put("Address", null);
  source.put("Sex", "");
  
  StringBuilder builder = new StringBuilder();
  
  source.entrySet()
   .parallelStream()
   .filter(e->e.getValue() != null)
   .filter(e->e.getValue().length() != 0)
   .forEachOrdered(e -> append(builder, e.getKey(), e.getValue()));
  
  String tmpResult = builder.toString();
  
  System.out.println(tmpResult);
  System.out.println (tmpResult.replaceFirst(" and " + "$", ""));
 }
 
 private static void append(StringBuilder builder, String key, String value) {
  builder.append(key + "='" + value + "' and " );
 }

}

MuleSoft Application Development With JMS Queue Explained: Part Four

Introduction

In my previous 3 blogs about integration using JMS Queue, have covered:

  1. JMS connector setup, inbound and outbound jms queues, and message selector
  2. JMS request and response patterns
  3. Request and response pattern using request-reply scope

In this article, I will cover how to set the outbound JMS message properties.

Set Single Property

To set a single property for the JMS message, we can use the "property" transformer as should in the following diagram:

Set Multiple Properties

To set multiple properties, we need to use message property transfromer:


Graphically, you can do the following:
And add the properties in the global property transform:

Complete Flow


Thursday, March 24, 2016

MuleSoft Application Development: Using Idempotent Message Filter

Introduction

Here is the question:
How can we prevent a GUI user from submitting the same order multiple times with a short period of time?

Idempotent Message Filter is the answer. This filter will reject the submission of orders with same ID. This ID can be defined in MEL. This article explains how to setup idempotent message filter in a mule application flow.


Setup A Mule Flow

The diagram below shows the flow setup. Note that, we need to convert payload from stream to string in order to have the filter works properly.


Idempotent Message Filter Configuration

The follow two diagrams show how to configure the objectstore required for Idempotent Message Filter. The reason we persist the object store is that if for some reason, the mule runtime crushes, once the runtime starts again, the filter will still work.

The TTL should be less than 1 minutes. If it is too long, we may block the legitimate update cases. If it is too short, we may have the collisions.

Test Idempotent Message Filter

Here is the simple json payload for the testing:
{ 
    "name"   : "John Smith"
}

Use Postman send the first request, we should get message back with "YAY!". If you send again within few seconds, you will get the message of: "You cannot enter the same request with 60 seconds". You should also see the exception as the following:


ERROR 2016-03-24 19:04:51,112 [[poc-basic].HTTP_Listener_Configuration.worker.01] org.mule.exception.CatchMessagingExceptionStrategy: 
********************************************************************************
Message               : Message has been rejected by filter. Message payload is of type: String
Type                  : org.mule.api.routing.filter.FilterUnacceptedException
Code                  : MULE_ERROR--2
JavaDoc               : http://www.mulesoft.org/docs/site/current3/apidocs/org/mule/api/routing/filter/FilterUnacceptedException.html
Payload               : { 
    "name"   : "John Smith"
}
********************************************************************************
Exception stack is:
1. Message has been rejected by filter. Message payload is of type: String (org.mule.api.routing.filter.FilterUnacceptedException)
  org.mule.processor.AbstractFilteringMessageProcessor:69 (http://www.mulesoft.org/docs/site/current3/apidocs/org/mule/api/routing/filter/FilterUnacceptedException.html)
********************************************************************************
Root Exception stack trace:
org.mule.api.routing.filter.FilterUnacceptedException: Message has been rejected by filter. Message payload is of type: String
 at org.mule.processor.AbstractFilteringMessageProcessor.filterUnacceptedException(AbstractFilteringMessageProcessor.java:69)

This means the filter is working!


Conclusion

  • The purpose of Idempotent Message Filter is to prevent the same message passing through the flow. It is very import if you don't want the POST, UPDATA operation to submit multiple times within a short period of time
  • The message id cannot be stream. It must be serializable Java objects, such as String.
  • The TTL should be less than 1 minute

Reference

MuleSoft Document: https://docs.mulesoft.com/mule-user-guide/v/3.7/idempotent-filter

Thursday, March 17, 2016

MuleSoft Application Development: Introduction To DevKit Connector

Introduction

The main purpose of this article is demonstrate the procedures to develop a custom Anypoint platform connector. It is a practical example for advance MuleSoft developers, given that he/she understand the Java annotations, Maven project, and have the essential skills for Mule application development.

    As an MuleSoft integration architect or developer, you will have many situations where you found the existing connectors are broken. This may be the connector has not been updated for the new version of database, such as Cassandra, MongoDB, etc. In this case, you need to fix the problem in order to perform your development tasks. In other cases, there may not be any existing connectors available for your development. Thus, we need to develop our own connectors. Fortunately, MuleSoft's AnyPoint Platform makes this kind of task simple by providing a DevKit.

   This post is an introduction to the Anypoint DevKit Connector development, i. e. HelloWorldConnector. For details, you may refer to the MuleSoft document

Install DevKit

Here is the reference for setting up development environment for MuleSoft DevKit: https://docs.mulesoft.com/anypoint-connector-devkit/v/3.7/setting-up-your-dev-environment If you have installed the MuleSoft DevKit correctly, you can check by New --> Other --> expand Mule. You should see the following:
This means you are ready to develop MuleSoft DevKit Connectors.

Custom Connector Development

Create Project

New --> Other --> Anypoint Connector Project:
Choose JDK Based (default) --> Next
Check Generate Tests. For now, let's not keep things simple without checking the data sense. Click Finish. Now, AnyPoint Studio creates the basic project for us as the following:
Actually, this project contains all the basics about connector. I will explain the details later. For now, let us put the connector into action.

Run The Functional Test

Open the RunctionalTestSuite, and run the Junit test: You will see the following error:
ERROR 2016-03-17 11:25:31,397 [main] org.mule.tools.devkit.ctf.configuration.ConfigurationManager: No M2HOME was set and M2Home autodetection did not detect your M2 home. You can either set the M2HOME/M2_HOME environment variable or specify the System property with -Dm2home=yourM2Home (VM Arguments, System Properties or Maven Properties).

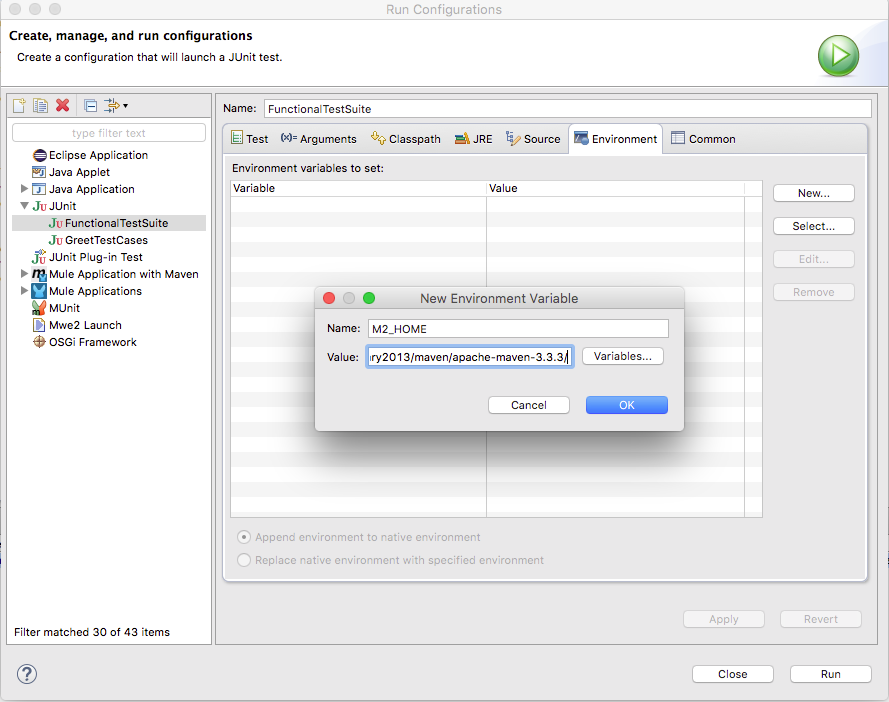
We can fix this by setup the test configuration:
By adding the M2_HOME variable and point to our Maven Installation Hoome, the test can start. But it will fail the testing. We need to fix the test methods in GreetTestCase.java. By adding the changeing lines 29 and 30 with the following:

	
	@Test
	public void verify() {
		java.lang.String expected = "Hello Gary Liu. How are you?";
		java.lang.String friend = "Gary Liu";
		assertEquals(getConnector().greet(friend), expected);
	}

}

Now are ready to package the connector.

Packaging

cd ${WORK_SPACE}
cd simple-jdk-hello-world-connector/
mvn clean package


Gary2013@Guojiangs-MBP:~/tcc-dev/poc/simple-jdk-hello-world-connector$ ls -lart target
total 1400
drwxr-xr-x  18 Gary2013  staff   612B Mar 17 11:43 ../
drwxr-xr-x   3 Gary2013  staff   102B Mar 17 11:43 connector-model/
drwxr-xr-x   4 Gary2013  staff   136B Mar 17 11:43 test-classes/
-rw-r--r--   1 Gary2013  staff    32K Mar 17 11:43 simple-jdk-hello-world-connector-1.0.0-SNAPSHOT-sources.jar
drwxr-xr-x   3 Gary2013  staff   102B Mar 17 11:43 maven-status/
drwxr-xr-x   3 Gary2013  staff   102B Mar 17 11:43 maven-archiver/
drwxr-xr-x   3 Gary2013  staff   102B Mar 17 11:43 generated-test-sources/
drwxr-xr-x   4 Gary2013  staff   136B Mar 17 11:43 generated-sources/
drwxr-xr-x  10 Gary2013  staff   340B Mar 17 11:43 classes/
-rw-r--r--   1 Gary2013  staff   140K Mar 17 11:43 simple-jdk-hello-world-connector-1.0.0-SNAPSHOT.zip
-rw-r--r--   1 Gary2013  staff   172K Mar 17 11:43 simple-jdk-hello-world-connector-1.0.0-SNAPSHOT.jar
-rw-r--r--   1 Gary2013  staff    38K Mar 17 11:43 original-simple-jdk-hello-world-connector-1.0.0-SNAPSHOT.jar
drwxr-xr-x   6 Gary2013  staff   204B Mar 17 11:43 update-site/
-rw-r--r--   1 Gary2013  staff   313K Mar 17 11:43 UpdateSite.zip
drwxr-xr-x  15 Gary2013  staff   510B Mar 17 11:43 ./

You can see we create 2 zip files. We are going to install the file UpdateSite.zip into our Anypoint Studio.

Install Custom DevKit Connector

Help --> Install New Software --> Add


After few clicks, Anypoint Studio will install the newly created HelloWorld Connector. We will nedd to restart the studio.  

Now, we are ready to test our newly created Hello World connector.

Testing DevKit Connector

Now, let's create new Mule project name: use-hello-world and create a simple flow as the following:


Now if you look the Mule paletter you should see a new connector "SimpleJDKHelloWorld" as shown in the following figure: 


Awesome!

Now, let's do some testing. Drag and drop the SimpleJDKHelloWorld Connect to the flow of "use-simple-jdk-hello-world_Flow":

Now you can configure the connector as HTTP connector as shown below:


You can complete the rest configuration by the following:


Your final flow may looks like the following:


Now, you can perform same testing as the following:


That is all! It is fairly straight forward, at least from the starting point of view. Of course, this is just starting point of the journey. The development of enterprise grade connector takes huge effort, in particular, if you add data sense, connection management, security, etc.

Key Learning Points

In this demo, we have learned the procedures of:

  1. creating DevKit Connector project from scratch
  2. functional testing of the connector
  3. install the customer connector
There are few other technical aspects we have not touched yet. These are DevKit Connector related annotations such as
  • @Connector
  • @Processor
  • @Config
  • @Configuration
  • @Configurable

References


  1. General: https://docs.mulesoft.com/anypoint-connector-devkit/v/3.7/
  2. Setup Development Environment : https://docs.mulesoft.com/anypoint-connector-devkit/v/3.7/setting-up-your-dev-environment
  3. Tutorial: https://mulesoft.github.io/mule-cookbook-tutorial/

Friday, March 11, 2016

MuleSoft Application Development With JMS Queue Explained: Part Three

Introduction

In my last post, I covered the configuration of request-reply pattern. This can also achieve by using the request-reply scope

The Configuration

The XML file is listed as the following:


This approach is clearly defined which queue the reply will be stored, instead of using unnamed temporary queue. In terms of clarity, this is better approach. However, in the clustering environment, this may be problematic. This needs to be confirmed with MuleSoft.

MuleSoft Application Development With JMS Queue Explained: Part Two

Introduction

In the first part, I have covered the basic setup of mule flows using queues to publish and consume JMS messages. In this part, I will cover request-response exchange pattern. Basically we want to publish a message to a JMS queue and then wait for reply from the consumer. The details about how this can be achieved using Java are clearly described at this article
http://activemq.apache.org/how-should-i-implement-request-response-with-jms.html

The Message Producer Configuration

The mule configuration for JMS endpoints has the exchange pattern of one-way or request-response. Check the request-response button as show in the figure below:
The XML configuration looks like the following:
        

Mule Flow Configuration

In order to demonstrate the request-response pattern, I created two flows, as shown in the following figure:
The corresponding XML configuration is listed as the following:


JMS Correlation ID

To set the correlation ID is critical to the request-response exchange pattern. Without this, the pattern will not work. Here is the how we can set the correlation ID:
        

MuleSoft Application Development With JMS Queue Explained: Part One

Introduction

This article has two parts. This is the first part. In this part, I will demonstrate how to setup the basic flow, which involves jms inbound and outpoint points. In the mule flow, JMS the outbound-endpoint is the message producer. On the other hand, the JMS inbound-endpoint is the message consumer. The key concepts covered in this article are the following:
  • How to set JMS properties in Mule flow
  • How to configure ActiveMQ connectors
  • How to configure JMS inbound- and outbound-endpoints
For JMS, Mule support one-way and request-response exchange patterns. This part covers the one-way exchange pattern. The next part will cover the request response pattern.

ActiveMQ Connector Setup

In the Mule integration with JMS brokers like ActiveMQ, the first step is to configure the JMS connector as show the following figure.
The general tab as shown in the next figure has the connector name, brokerurl, and access to ActiveMQ credentials.
You should also pay attention to the Advanced tab. In this tab, you can configure JNDI, durable consumer, or define the PERSISTENT delivery mode, etc.. Mule has default values for all these advanced configuration.
If you want to change the delivery mode from NON-PERSISTENT to PERSISTENT, you will need to check the persistence delivery. By default, mule create 4 consumers for each queue, you may adjust that value as well accordingly.

Configure The Mule Flow With One-Way Exchange Pattern

The main purpose of this basic configuration is to demonstrate how to build mule flows to publish and consume jms message. Another point I want to make is that how Mule set the outpond properties to JMS properties.

The Use Case

  • A client will invoke a RESTful service
  • The client will send a JSON Payload
  • ESB will perform the following:
    1. transform the json to java LinkedHashMap
    2. set JMS header source_id
    3. publish the message to a queue
  • A second flow: Process_Order_Flow listen on the order.queue
  • log the payload
  • send the payload to another queue: order.special.queue The json example is provided as the following:
    { "name"   : "John Smith",
      "sku"    : "20223",
      "price"  : 23.95,
      "shipTo" : { "name" : "Jane Smith",
                   "address" : "123 Maple Street",
                   "city" : "Pretendville",
                   "state" : "NY",
                   "zip"   : "12345" },
      "billTo" : { "name" : "John Smith",
                   "address" : "123 Maple Street",
                   "city" : "Pretendville",
                   "state" : "NY",
                   "zip"   : "12345" }
    }
    

    Configure The Mule Flow For One-Way

    The Mule Flow Diagram is shown as the following:
    The xml configuration for the flow is listed as the following:


    Message Selector

    We can add jms message selector to either jms inbound-endpoint or outbound-endpoint as shown below. However, it only takes effects on the inbound-endpoint.


    Also, noted that source_id is a JMS message property. Mule copies all the outbound properties to the JMS message properties. The inbound properties are not automatically copied to the outbound properties when the flow crosses the transport boundary. You may be tempted to reply the ATG in the message selector configuration. Unfortunately, this cannot be done, because this is pre-defined in the ActiveMQ broker configuration.

Tuesday, February 2, 2016

Install Salesforce Plugin to MuleSoft Anypoint Studio

Introduction

Salesforce provides a very useful plugin for Eclipse based IDE. Nowadays, I work a lot of cases for salesforce integration using Mule Anypoint Studio. This article describe the procedures for installation and usage.

Install Force.com Plugin

Help -> Install New Software Enter the following to as show in the Figure: salesforce plugin - http://media.developerforce.com/force-ide/eclipse42
After installation, you should check if the plugin is installed by Help -> Installation Details

Create force.com Project

In order to review the Salesforce data, we need to create force.com project. New -> Other
Enter credentials of the targeted Salesforce environment:
The project will be created. What I am interested most of the times is about to query the Salesforce.
You can write sql like query to check the data in the salesforce, or you can check the schema.

Anypoint Studio Error: The project is missing Munit lIbrary to run tests

Anypoint Studio 7.9 has a bug. Even if we following the article: https://help.mulesoft.com/s/article/The-project-is-missing-MUnit-libraries-...