Saturday, December 15, 2018

Mule 4 Integration With Cassandra

Introduction

Mule 4 Cassandra Database Connector, current version of 3.10, has made significant improvement over the previous version. It is fairly straight forward to setup the integration to the Cassandra Database using the connector. This article is an introduction of the Cassandra Connector to Cassandra cluster.

Cassandra Cluster Configuration

I have created 2 a two node cluster as shown the in following diagram. The details on how to setup the Cassandra clustering will be covered in another post. Basically, I opened the native transport port 9042, which is the default vale on both nodes.
We need to some initial setup using cqlsh too by run the following command:
$ cqlsh -u cassandra -p casandra
cassandra@cqlsh> create keyspace if not exists dev_keyspace with replication = {'class' : 'SimpleStrategy', 'replication_factor' : 2};
The above command will create a keyspace, namely dev_keyspace. We can query the keyspaces by the following command:
cassandra@cqlsh> desc keyspaces;
You should see the following:
system_schema  system      system_distributed
system_auth    dev_keyspace  system_traces
The next step is to create emp table by the following command:
cassandra@cqlsh> create table emp (empid int primary key, emp_first varchar, emp_last varchar, emp_dept varchar);
And insert a row:
create table emp (empid int primary key, emp_first varchar, emp_last varchar, emp_dept varchar);
insert into emp (empid, emp_first, emp_last, emp_dept) values (1, 'Gary','liu','consulting');
That is all and we are ready to do the integration.

Integration Using Mule 4 Cassandra Connector

Add Cassandra Connector

First, we need to search the Exchange and add the Cassandra Connection as shown in the following snapshot:

Create CassandraDB Config

Create a mule configuration, namely, global-config.xml. Then create CasandraDB Config as the following:
Enter the General setting as the following. Note: Leave the Host empty as we use cluster configuration.
Now, click the "Advanced Settings" tab and enter the information as the following:

As you can see, we can enter the ip addresses separated by comma. In this way, we can achieve high availability from client side of view. Now, we test the connectivity. If the port of 9042 is exposed correctly, it should work fine. I will explain more in the next article on how to make sure we expose the native transport port correctly.

Create Integration Flows

Read Flow

The read flow is very straight forward. The cassandra-db:select operation uses payload as the whole query. We just need to set payload. In this case, it is "select * from emp;"

<flow name="select-objecsFlow" doc:id="8bdcc4fe-cf4e-49be-b2f9-2dfacbddaf4b" >
<http:listener doc:name="Listener" doc:id="ab57d8ab-2623-468b-b635-a0c6efd6c829" config-ref="HTTP_Listener_config" path="/cassandra/emp"/>
<set-payload value="select * from emp;" doc:name="Set Payload"  />
<cassandra-db:select doc:name="Select"  config-ref="CassandraDB_Config_cluster" />
<ee:transform doc:name="Transform Message"  >
<ee:message >
<ee:set-payload ><![CDATA[%dw 2.0
output application/json
---
payload]]></ee:set-payload>
</ee:message>
</ee:transform>
<logger level="INFO" doc:name="Logger" doc:id="e6097436-1909-4d8b-8c81-27be82c11714" message="#[payload]" />
</flow>

</mule>

Insert A Row

To insert a row, we need to use insert operation as the following:

<flow name="insert-objecsFlow" doc:id="8bdcc4fe-cf4e-49be-b2f9-2dfacbddaf4b" >
<http:listener doc:name="Listener" doc:id="ab57d8ab-2623-468b-b635-a0c6efd6c829" config-ref="HTTP_Listener_config" path="/cassandra/emp/create"/>
<ee:transform doc:name="Transform Message" doc:id="0d484493-fa23-4a56-9547-58f0bb54dbd1" >
<ee:message >
<ee:set-payload ><![CDATA[%dw 2.0
output application/java
---
payload]]></ee:set-payload>
</ee:message>
</ee:transform>
<cassandra-db:insert table="emp" doc:name="Insert" doc:id="71cb7584-981a-4475-a839-ea82ed3b9832" config-ref="CassandraDB_Config_vm1" keyspaceName="rogers_dev"/>
<ee:transform doc:name="Transform Message"  >
<ee:message >
<ee:set-payload ><![CDATA[%dw 2.0
output application/json
---
payload]]></ee:set-payload>
</ee:message>
</ee:transform>
<logger level="INFO" doc:name="Logger" doc:id="e6097436-1909-4d8b-8c81-27be82c11714" message="#[payload]" />

</flow>

Currently, we can only insert one row at a time. To insert multiple rows, we can use for loop or use batch processes for large volumes. 

About CassandraDB Connector

The detailed information can be found at the following Mulesoft Document:
https://docs.mulesoft.com/connectors/cassandra/cassandra-connector

Important Cassandra Information

When you using cqlsh to connect Cassandra cluster, you should notice the following:

cqlsh -u cassandra -p cassandra
Connected to DevelopmentCluster at 127.0.0.1:9042.
[cqlsh 5.0.1 | Cassandra 3.11.3 | CQL spec 3.4.4 | Native protocol v4]

The v4 is the current native protocol version, which is required to configure the connector.


Saturday, August 4, 2018

Mule 4 : Dataweave 2 In Action - Use Function Modules

Introduction

In Mule 4, the mel2 functionalities are replaced by the Dataweave 2 ones. For those who worked in Mule 3, you will find the mule 4 ways of using function modules are much more advanced than the old way (see my post). In this article, I am going to present Mule 4 ways to define and use global functions.

Define Functions In Dataweave Modules

Here is my project layout:

As you can see, I place the function modules in the dir: src/main/resources/modules. And the dataweave function module is defined in CommonFunc.dwl.

%dw 2.0
fun concatName(aPerson) = aPerson.firstName ++ ' ' ++ aPerson.lastName

fun stringToDateUTC(dateString) = ((dateString as String {format: "yyyy-MM-dd'T'HH:mm:ss.SSSZ"} >> "UTC"
 )) as DateTime {format: "yyyy-MM-dd'T'HH:mm:ss.SSS"} 

I defined two functions: concatName, stringToDateUTC. The purposes are self-explained.

Use Function Modules

I place the normal dataweave modules in the dir of src/main/resources/dataweave. The usage of the functions is demonstrated at the following dwl file:

%dw 2.0
import * from modules::CommonFunc
output application/json
---
{
 "Name" : concatName(payload),
 "CreatedDate" : stringToDateUTC(payload.createdDate)
}

Here are few points:

  • import functions
    1. import modules::CommonFuc
    2. import * from modules::CommonFunc
    3. import concatName stringToDateUTC from modules::CommonFunc
  • use functions in dwl
    1. CommonFunc::concatName(payload)
    2. concatName(payload)

For those who know python, you may find the syntax is very similar between the two languages, in terms of modules, and references.

Testing Data

Here is the complete flow:


Here is testing data:
{
 "firstName" : "Gary",
 "lastName" : "Liu",
 "createdDate":"2018-07-17T16:18:03+00:00"
}

Wednesday, July 25, 2018

Mule 4: Dataweave 2 In Action - Using Filter

Use Cases

The requirement is to update overall status to PARTIAL if there is any failure record in the payload, i. e. item.status = "Failed"

Input:
{
    "status": "SUCCESS",
    "items": [
        {
            "accountId": "10101xyzabc",
            "status": "Success"
        },
        {
            "accountId": "10102aaabbb",
            "status": "Failed"
        }
    ]
}
Expected Output:
{
    "status": "PARTIAL",
    "items": [
        {
            "accountId": "10101xyzabc",
            "status": "Success"
        },
        {
            "accountId": "10102aaabbb",
            "status": "Failed"
        }
    ]
}

Datawave 2.0

%dw 2.0
output application/json
---
{
 status: if (sizeOf(payload.items map($) filter ($.status == "Failed")) > 0) "PARTIAL" else "SUCCESS",
 items: payload.items 
}

Complete Flow

The following is the complete flow. Please note that I have commented out the transformation payload to java. This is a big improvement of Mule 4 over mule 3.


Key Learnings

  1. sizeOf function
  2. filter function
  3. if else, in Dataweave 1.0, this will be when else
if else is a very good syntax improvement over Dataweave 1.0

Sunday, July 15, 2018

Enable JMX Authencation And SSL For Mule Runtime

Introduction

In my previous blog, I demonstrated how to change mule application logging level dynamically by using JMX MBeans. In that blog, I skipped the procedure on how to enable SSL for JMX of Mule runtimes. Apparently, in production environment, we will need to enable both authentication and SSL for the security purpose.

I will demonstrate the details about enabling SSL for on-premises Mule Runtimes. I will use local generated Cert for demonstration purpose. You may need to authorized the cert for your organization, but the basic procedures are the same.

Generate Keystore and Truststore

On mule runtime server, execute the following commands:

mkdir ${MULE_HOME}/ssl
cd ${MULE_HOME}/ssl
keytool -genkey -alias tc401 -keyalg RSA -keystore tc401_keystore.jks
keytool -export alias tc401 -file tc401_cert -keystore tc401_keystore.jks
keytool -import -alias tc401 -keystore tc401_truststore.jks -file tc401_cert

The above commands will create keystore and truststore, which will be used by Mule Runtimes. To instruct a Mule Runtime to use the keystore and truststore, we need to update wrapper.conf file.

Configure Mule Runtime with Authentication and SSL

Add the following lines to ${MULE_HOME}/conf/wrapper.conf

wrapper.java.additional.50=-Dcom.sun.management.jmxremote=true
wrapper.java.additional.51=-Dcom.sun.management.jmxremote.port=1099
wrapper.java.additional.53=-Dcom.sun.management.jmxremote.access.file=%MULE_HOME%/conf/jmxremote.access
wrapper.java.additional.54=-Dcom.sun.management.jmxremote.password.file=%MULE_HOME%/conf/jmxremote.password
wrapper.java.additional.56=-Dcom.sun.management.jmxremote.authenticate=true
wrapper.java.additional.57=-Dcom.sun.management.jmxremote.ssl=true
wrapper.java.additional.58=-Djavax.net.ssl.keyStore=%MULE_HOME%/ssl/tc401_keystore.jks
wrapper.java.additional.59=-Djavax.net.ssl.keyStorePassword=changeme
wrapper.java.additional.60=-Djavax.net.ssl.trustStore=%MULE_HOME%/ssl/tc401_keystore.jks
wrapper.java.additional.61=-Djavax.net.ssl.trustStorePassword=changeme

Note that I use jmxremote.access and jmxremote.password for the user permission and authentication. The details can be refered in my last blog.

Start jvisualvm

jvisualvm -J-Djavax.net.ssl.trustStore=./tc401_truststore.jks -J-Djavax.net.ssl.trustStorePassword=changeme
The following snapshots shows how the page of login with SSL enabled.

Friday, July 13, 2018

Dynamically Change Mule Application Logging Level At Runtime

Introduction

In many situations, we need to change the logging level from WARN to DEBUG, then change it back to WARN after a period of time. There are few ways to do so as the following. Many unexperienced developers will change log4j2.xml file. For instance, if we want to log all the requests and responses for all HTTP Listener, we can change the log4j2.xml by add the following lines:

<AsyncLogger name="org.mule.module.http.internal.HttpMessageLogger" level="INFO"/>
<AsyncLogger name="com.ning.http" level="INFO" />

This approach works, but it is often very changing if not impossible. To change code in production environment should be considered as a last resort. There are other ways such as  command line, or use web services.
< However all the above mentioned approach requires more effort the JMX approach, which is simplest way in my humble opinion. This article will demonstrate how we can achieve this.

Enable JMX For Mule Runtime

To enable jmx, we will need to update wrapper.conf, which is at ${MULE_HOME}/conf/wrapper.conf. Add the following lines:

wrapper.java.additional.50=-Dcom.sun.management.jmxremote
wrapper.java.additional.50=-Dcom.sun.management.jmxremote=true
wrapper.java.additional.51=-Dcom.sun.management.jmxremote.port=1099
wrapper.java.additional.53=-Dcom.sun.management.jmxremote.access.file=%MULE_HOME%/conf/jmxremote.access
wrapper.java.additional.54=-Dcom.sun.management.jmxremote.password.file=%MULE_HOME%/conf/jmxremote.password
wrapper.java.additional.56=-Dcom.sun.management.jmxremote.authenticate=true
wrapper.java.additional.55=-Dcom.sun.management.jmxremote.ssl=false

The above configuration requires to create two files: jmxremote.access and jmxremote.password under ${MULE_HOME}/conf. The following are examples:

$cat jmxremote.access
admin readwrite
gary  readonly

$cat jmxremote.password
admin admin
gary gary

To enable ssl requires generate certificates. I will cover the topic later

Configure jvisualvm And Change Logging Level

jvisualvm comes with Java SDK. For the details about the setup you may refer to my blog . The most important thing is to make sure you install MBeans pluging. The following snapshot shows the details:
You can traverse to the component at org.apache.logging.log4j2, under Loggers, you can change any log4j2 bean's log level as shown in the following snapshot:
In practice, you can do a lot of more with jvisualvm to inspect the mule runtime. I will cover more in my later blogs.

Tuesday, July 10, 2018

Install anypoint-cli on-premise in Off-Line mode

Introduction

anypoint-cli is a very powerful tool, which can perform a lot of operations of mule application management, environment setup, etc. Mulesoft provides a good document online: https://docs.mulesoft.com/runtime-manager/anypoint-platform-cli. However, in many on-premise environment there is no direct access to outside world. We need to install anypoint-cli in the off-line mode. Mulesoft has a documentation on this: https://support.mulesoft.com/s/article/How-to-perform-offline-installation-of-Anypoint-CLI This post is to address the details of the deployment, which includes install node, configure anypoint-cli environment.

Make Sure Your Proxy Setup Is Correct

On-premise setup mule often requires proxy setup. Here is the example of the proxy configuration:
export https_proxy=http://functional-account-name:password@YOUR-DOMAIN.com:YOUR-PORT
export no_proxy=xyz.com,localhost,,192.168.0.0/16,127.0.0.1,.xyz.com,.abc.com

Install Node

The following link is very helpful: https://tecadmin.net/install-latest-nodejs-and-npm-on-centos/ Make sure you have root access.

Install anypoint-cli

Follow the mulesoft document. https://support.mulesoft.com/s/article/How-to-perform-offline-installation-of-Anypoint-CLI. Make sure use root.
  npm install -g npm-bundle
  npm-bundle --verbose anypoint-cli
The last command will download anypoint-cli tgz file: anypoint-cli-2.3.2.tgz Once the lastest anypoint-cli package is downloaded, you can copy it to target linux node and do the following (as sudo user, don't run as root directly):
  npm install -g /tmp/anypoint-cli-2.3.2.tgz

Configuration & Test Run

Put the following in you .anypoint_env.dev file:
ANYPOINT_ENV=dev
ANYPOINT_HOST=anypoint.mulesoft.com
ANYPOINT_USERNAME=anypoint-user-name
ANYPOINT_PASSWORD=password
ANYPOINT_ORG=org-name
You can create many file like this. When you work on one, say, dev environemtn, you can source the file of .anypoint_env.dev. Once you have completed the installation you can run the following command as normal user:
anypoint-cli runtime-mgr standalone-application list
ID      Name                                        Target ID Target Name           Status  Updated

2400923 gcc-mule-services-cache-management          507876    gcc-mule-dit1-cluster STARTED 5 hours ago
2400924 gcc-mule-services-cfgmgmt                   507876    gcc-mule-dit1-cluster STARTED 5 hours ago
2400925 gcc-mule-services-cfgmgmt-ptdata-consumer   507876    gcc-mule-dit1-cluster STARTED 5 hours ago
2400926 gcc-mule-services-cfgmgmt-ptupdate-consumer 507876    gcc-mule-dit1-cluster STARTED 5 hours ago
2400927 gcc-mule-services-datacapture               507876    gcc-mule-dit1-cluster STARTED 5 hours ago
2400928 gcc-mule-services-datastore-consumer        507876    gcc-mule-dit1-cluster STARTED 5 hours ago
2400929 gcc-mule-services-fileexchange-process      507876    gcc-mule-dit1-cluster STARTED 5 hours ago
2400930 gcc-mule-services-filemanager               507876    gcc-mule-dit1-cluster STARTED 5 hours ago
2400931 gcc-mule-services-fileupload                507876    gcc-mule-dit1-cluster STARTED 5 hours ago
2400932 gcc-mule-services-fileupload-process        507876    gcc-mule-dit1-cluster STARTED 5 hours ago
2400933 gcc-mule-services-processlog-consumer       507876    gcc-mule-dit1-cluster STARTED 5 hours ago
2400934 gcc-mule-services-sfg                       507876    gcc-mule-dit1-cluster STARTED 5 hours ago
2400935 gcc-mule-services-transformation-consumer   507876    gcc-mule-dit1-cluster STARTED 5 hours ago
2400936 gcc-mule-services-transporter               507876    gcc-mule-dit1-cluster STARTED 5 hours ago
2400937 gcc-mule-services-validation-consumer       507876    gcc-mule-dit1-cluster STARTED 5 hours ago

Thursday, June 14, 2018

Install & Setup RabbitMQ on MacOS

Instroduction

Installation and setup RabbitMQ is pretty straight forward now, given the well published documentation. This post describes the basic steps for the purpose of Mule integration.

Installation

The easiest one is to use brew as the following:
$ brew install rabbitmq
$ which rabbitmqadmin
The newly installed tools are at:
liug@WRTVLMDV0002N37:~$ ls -lart /usr/local/sbin
total 0
lrwxr-xr-x   1 liug  admin    41B May 30 10:45 rabbitmqctl@ -> ../Cellar/rabbitmq/3.7.5/sbin/rabbitmqctl
lrwxr-xr-x   1 liug  admin    43B May 30 10:45 rabbitmqadmin@ -> ../Cellar/rabbitmq/3.7.5/sbin/rabbitmqadmin
lrwxr-xr-x   1 liug  admin    45B May 30 10:45 rabbitmq-server@ -> ../Cellar/rabbitmq/3.7.5/sbin/rabbitmq-server
lrwxr-xr-x   1 liug  admin    46B May 30 10:45 rabbitmq-plugins@ -> ../Cellar/rabbitmq/3.7.5/sbin/rabbitmq-plugins
lrwxr-xr-x   1 liug  admin    42B May 30 10:45 rabbitmq-env@ -> ../Cellar/rabbitmq/3.7.5/sbin/rabbitmq-env
lrwxr-xr-x   1 liug  admin    50B May 30 10:45 rabbitmq-diagnostics@ -> ../Cellar/rabbitmq/3.7.5/sbin/rabbitmq-diagnostics
lrwxr-xr-x   1 liug  admin    47B May 30 10:45 rabbitmq-defaults@ -> ../Cellar/rabbitmq/3.7.5/sbin/rabbitmq-defaults
lrwxr-xr-x   1 liug  admin    40B May 30 10:45 cuttlefish@ -> ../Cellar/rabbitmq/3.7.5/sbin/cuttlefish

Start Server

$ rabbitmq-server

  ##  ##
  ##  ##      RabbitMQ 3.7.5. Copyright (C) 2007-2018 Pivotal Software, Inc.
  ##########  Licensed under the MPL.  See http://www.rabbitmq.com/
  ######  ##
  ##########  Logs: /usr/local/var/log/rabbitmq/rabbit@localhost.log
                    /usr/local/var/log/rabbitmq/rabbit@localhost_upgrade.log

              Starting broker...
 completed with 6 plugins.

Check Listening Ports

$ lsof -iTCP -nP | egrep LISTEN | egrep beam
beam.smp  67306 liug   79u  IPv4 0x5f93ad255eddc27d      0t0  TCP *:25672 (LISTEN)
beam.smp  67306 liug   90u  IPv4 0x5f93ad255c3a127d      0t0  TCP 127.0.0.1:5672 (LISTEN)
beam.smp  67306 liug   91u  IPv6 0x5f93ad255f408cd5      0t0  TCP *:61613 (LISTEN)
beam.smp  67306 liug   92u  IPv6 0x5f93ad255f408715      0t0  TCP *:1883 (LISTEN)
beam.smp  67306 liug   93u  IPv4 0x5f93ad256141be9d      0t0  TCP *:15672 (LISTEN)
Note:
Port Purpose
5672 TCP
61613 STOMP
1883 MQTT
15672 Management - Web Console

Import Logs

The logs are located at /usr/local/var/log/rabbitmq/rabbit@localhost.log, which contains very important information like the following about different listeners.

Configurations

There are a lot of important configurations located at:

/usr/local/Cellar/rabbitmq/3.7.5/ebin

The default user ID and password are guest/guest, which is defined at rabbit.app file.

Wednesday, May 30, 2018

Setup Proxy On Anypoint Studio

What Is The Proxy Setting In Your Working Environment?

URL: chrome://net-internals/#proxy You should see a page looks like the following:
Got to the page: http:/wpad./wpad.dat Down load the page which contains all the proxy information like the following:
function FindProxyForURL(url,host)
{
    // set proxy server variables

    var usproxy="PROXY usproxy.XXX.com:8080";
    var dc1host="PROXY XXX.com:8080";
    var dc2host="PROXY XXX.com:8080";

Setup Proxy on Anypoint Studio

Preferences --> Network Connections
Make sure you select Active Provider as "Manual"

Tuesday, May 22, 2018

Install and Configure Java Decompiler ECD In AnyPoiintStudio 7

Introduction

ECD, Enhanced Class Decompiler, so far is the best java class decompiler plugin available for Eclipse and Mule AnyPointStudio. It support JAD, JD, FernFlower, CFE and Procyon. The best of all is that it allows us to debug the code which we don't have source code. For details, please refer to the article here

The ability to debug code without source code is critical to problem solving. In particular, nowadays, most documentation for Mule 4 are not complete. In this blog, I am going to cover the installation and configuration. For the installation, I will build the source code and install from my local. In this way, we learn the details about Eclipse plugin. And if we want to improve the plugin, we can change the code as we want.

The ECD works out of box for Mule Anypoint Studio 6.x. However, it will not work for 7.x. Actually this is caused by underlying Eclipse 4.7.x. This is the main reason I publish this article.

Build ECD Plugin

To build the ECD plugin we need to clone two repositories from github. The procedures are as the following (assume you have git directory under $HOME)
cd git
mkdir ecd
cd ecd
git clone https://github.com/ecd-plugin/ecd.git
git clone https://github.com/ecd-plugin/update.git
cd ecd
mvn clean package

Install And Configure ECD

After the successfully building the plugin, we can install it. Help --> Install New Software --> Add,
click Local
choose the update directory
You should see the following:

click Open
type ECD in the Name
click OK
Now click Finish and install as normal. After restarting the AnyPointStudio, we need to configure the ECD. Note that, it would not work out of box. First, let's check if the ECD is installed. Preference --> Java.
If you see the above, then the ECD is installed correctly. Now, if you try to look a java class, the source code would not be displayed. We need to do the following:
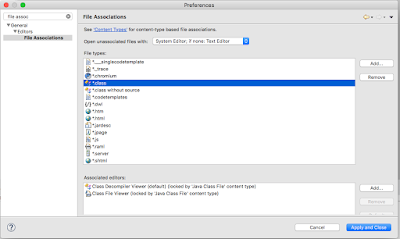
In the preferences, search File Assoc and client *.class, make the lower panel looks like the following
Do the same amke the *.class without source looks like the following:
Now, if you click any class, the Studio will display the source code. Per the author's article, FernFlower and JD are highly recommanded. FernFlower supports all Java versions, but JD is the fastest.

Sunday, May 20, 2018

Mule 4 Introduction - Embedded Runtime Information

Introduction

Mule Runtime 4.1 and AnypointStudio have changed significantly from Mule 3. The runtime information, such as applications, logs, libraries, etc have changed as well.

Runtime Environment Changes

First of all, if you have worked with Mule 3, you probably know where is your log, applications. They are at workspace/.mule directory as shown at the following:
gliu1@LM-SJL-11006574:~/AnypointStudio/workspace/.mule$ ll
total 16
drwxr-xr-x   3 gliu1  110500007    96 Mar  2 16:41 lib
drwxr-xr-x   5 gliu1  110500007   160 Mar 10 14:46 e0334610-24b4-11e8-b36c-acde48001122
drwxr-xr-x   5 gliu1  110500007   160 Mar 10 14:47 02ac31c0-24b5-11e8-b36c-acde48001122
drwxr-xr-x   5 gliu1  110500007   160 Mar 10 17:58 a405bdb0-24cf-11e8-b36c-acde48001122
drwxr-xr-x   5 gliu1  110500007   160 Mar 12 12:40 2dfe1450-262d-11e8-9448-acde48001122
drwxr-xr-x   5 gliu1  110500007   160 Mar 12 12:40 44128b90-262d-11e8-9448-acde48001122
drwxr-xr-x   5 gliu1  110500007   160 Apr  4 18:10 157c8440-386e-11e8-b273-acde48001122
drwxr-xr-x   5 gliu1  110500007   160 Apr  4 18:12 5eb15c80-386e-11e8-b273-acde48001122
drwxr-xr-x   5 gliu1  110500007   160 Apr  4 18:12 768759e0-386e-11e8-b273-acde48001122
drwxr-xr-x   5 gliu1  110500007   160 Apr 13 14:09 fdfecc90-3f5e-11e8-b669-acde48001122
drwxr-xr-x   5 gliu1  110500007   160 Apr 13 18:15 50393e60-3f81-11e8-b669-acde48001122
drwxr-xr-x   9 gliu1  110500007   288 May  3 19:11 plugins-tmp
drwxr-xr-x  21 gliu1  110500007   672 May  6 19:15 .
-rw-r--r--@  1 gliu1  110500007  6148 May  6 19:15 .DS_Store
drwxr-xr-x  24 gliu1  110500007   768 May 16 14:43 ..
drwxr-xr-x  75 gliu1  110500007  2400 May 17 08:26 logs
drwxr-xr-x   4 gliu1  110500007   128 May 17 19:44 conf
drwxr-xr-x   4 gliu1  110500007   128 May 17 19:44 domains
drwxr-xr-x  33 gliu1  110500007  1056 May 17 19:44 .mule
drwxr-xr-x   4 gliu1  110500007   128 May 17 19:44 apps
drwxr-xr-x   3 gliu1  110500007    96 May 17 19:44 policies
gliu1@LM-SJL-11006574:~/AnypointStudio/workspace/.mule$ 

In mule 4, this has been changed to the mule runtime installation directory. In my case, it is like the following:
gliu1@LM-SJL-11006574:/Applications/AnypointStudio-7-1-2.app/Contents/Eclipse/plugins/org.mule.tooling.server.4.1.1.ee_7.1.2.201803261303/mule$ ll
total 48
-rw-r--r--@  1 gliu1  110500007  3678 Mar 16 09:26 README.txt
-rw-r--r--@  1 gliu1  110500007   173 Mar 16 09:26 MIGRATION.txt
-rw-r--r--@  1 gliu1  110500007   518 Mar 16 09:26 LICENSE.txt
drwxr-xr-x@  8 gliu1  110500007   256 Mar 28 10:29 lib
drwxr-xr-x@  3 gliu1  110500007    96 Mar 28 10:41 tools
drwxr-xr-x@ 12 gliu1  110500007   384 Mar 28 10:41 bin
drwxr-xr-x@  8 gliu1  110500007   256 Mar 28 10:41 services
drwxr-xr-x@ 10 gliu1  110500007   320 Mar 28 10:41 ..
drwxr-xr-x   2 gliu1  110500007    64 May 18 18:16 domains-staging
drwxr-xr-x@  4 gliu1  110500007   128 May 18 18:18 server-plugins
drwxr-xr-x@  4 gliu1  110500007   128 May 18 18:18 policies
drwxr-xr-x   3 gliu1  110500007    96 May 18 18:18 tmp
-rw-r--r--   1 gliu1  110500007     0 May 19 18:18 Instance.lock
drwxr-xr-x@ 22 gliu1  110500007   704 May 19 18:18 .
-rw-r--r--   1 gliu1  110500007     6 May 19 18:18 mule_ee.pid
drwxr-xr-x   9 gliu1  110500007   288 May 19 18:18 .mule
drwxr-xr-x@ 18 gliu1  110500007   576 May 19 18:19 conf
drwxr-xr-x@  9 gliu1  110500007   288 May 19 18:19 logs
drwxr-xr-x@  4 gliu1  110500007   128 May 19 18:19 domains
drwxr-xr-x@  4 gliu1  110500007   128 May 19 18:19 apps
-rw-r--r--   1 gliu1  110500007     8 May 19 18:19 mule_ee.java.status
-rw-r--r--   1 gliu1  110500007     8 May 19 18:19 mule_ee.status
The new runtime environment is mule aligned with the standalone mule runtime directory layout. Thus, if you want to looks the runtime logs, you need to traverse to the mule directory. It is easier to create a link so that you don't have to cd to the deeper directory tree.

No More Session Variables

In mule 3, we have flowVars, sessionVars, and recordVars. In mule 4, all variables are referred as vars, i.e. vars.originalPayload. This is related to how connectors and transports work in mule 4. In mule 3, when message passes through the transport barriers the properties will change, i.e., inbound properties will become outbound properties. In Mule 4, there is no transport barrier anymore. This is because mule can handle consumable message (stream, reader, etc).

Mule Message

Mule message is mule 4 contains attributes, payload, and variables. The message.inboundproperties and message.outboundproperties are becoming attributes. message.id and message.rootId become message.serialVersionUID.

Sunday, May 13, 2018

Mule Application Dev: Email Notification With Apache Velocity Engine

Introduction

It is very common to send email notification for important event in the enterprise integration. Mule AnyPoint Platform come with parse-template component, which allow us to pass flow variables, payload, etc to the html template. This approach is very simple and straight forward for the simple email notification. The another approach is to using apache velocity engine to parse more complicated data set to the html template.

In this post, I am going to introduce the both. For the email server, I am going to using Gmail.

The complete code is available at my github repository

The Requirements

The requirement is that clients will pass a json request contains the informaiton as shown in the following:


{
 "subject": "Connection To Oracle Database Not Available",
 "emailTo": "gary.liu1119@gmail.com",
 "emailFrom": "guojiang.liu1119@gmail.com",
 "replyTo" : "gary.liu1119@gmail.com",
 "integrationId" : "OracleDB-To-SFDC",
 "body" : "This is the body message",
 "channel" : "slack channel",
 "footer": "This is generated email. Please DO NOT Reply to this email 
 
 Best Regards, 
 Mule Integration Team",
 "payload" : {
  "header" : ["column_a","column_b","column_c","column_d","column_f"],
  "data": [
   ["column_a_data1","column_b_data1","column_c_data1","column_d_data1","column_f_data1"],
   ["column_a_data2","column_b_data2","column_c_data2","column_d_data2","column_f_data2"],
   ["column_a_data3","column_b_data3","column_c_data3","column_d_data3","column_f_data3"]
   
  ]
 } 
}
The resultant email should look like the following:

Using Template Parser

This is very simple scenario. We will use the <parse-template ...=""> component as the following:
        
The html template is in the following form:
<html>
    <head>
      <title>#[original_payload.subject]</title>
    </head>
    <body>
      Environment: #[environment]
      Date: #[system_date]
      Integration Case ID: #[original_payload.integrationId]      
      #[original_payload.body]
     
      #[original_payload.footer]
 
    </body>
</html>
In the above html code, the #[environment] is the same as #[flowVars.environment] The flows for using parse-template are shown in the following diagram:

Using Velocity

Apache Velocity Engine is a powerful tool for build complicated html template. Here I only introduce the for loop. For more directives, you may refer the following document.

The html template is shown as the following:

<HTML>
    <HEAD>
      <TITLE>$emailInfo.subject</TITLE>
    </HEAD>
    <BODY>
      <BR>
      Environment: $emailInfo.environment     
      <BR><BR>
      Integration ID: $emailInfo.integrationId
      <BR/>
      <BR/>      
      $emailInfo.body     
      <BR/><BR/>   
      <TABLE width="70% "border = "1" cellspacing="0" cellpadding="2" font="5">
        <TR style="text-align: left; font-size: 14px; font-weight: bold; color: #000000;">
        
        #foreach ($headerCol in $emailInfo.payload.header)
                <TH>$headerCol</TH>
        #end
        
        </TR>
        
        #foreach ($data in $emailInfo.payload.data)
            <TR style="text-align: left; font-size: 13px; font-weight: bold; color: #488AC7;">          
            #foreach ($col in $data)
                <TD>$col</TD>
            #end            
            </TR>
        #end
      </TABLE>
     
     <BR/>
     <BR/>
      
     <I>$emailInfo.footer</I>
          
 
    </BODY>
</HTML>

As you can see that for loop takes the following form:

        
        #foreach ($headerCol in $emailInfo.payload.header)
              <TH>$headerCol</TH>
        #end

Where the emailInfo is a java object in the form of: LinkedHashMap emailInfo. The whole idea is MVC, Model, View, Control. The html is the view page, the mode is and java object. Control is the engine injecting data to the view.

The java code is in the following form:


public class VelocityComponent implements Callable
{
 private static Logger logger = LoggerFactory.getLogger(VelocityComponent.class);

 @SuppressWarnings("unchecked")
 @Override
 public Object onCall(MuleEventContext eventContext) throws Exception {
  LinkedHashMap payload = (LinkedHashMap)eventContext.getMessage().getPayload();
  String emailHtml = this.buildEmailHtml(payload);
  return emailHtml;
 }
 
    public String buildEmailHtml(LinkedHashMap emailInfo) throws Exception
    {
        VelocityEngine ve = new VelocityEngine();
        ve.setProperty(RuntimeConstants.RESOURCE_LOADER, "classpath");
        ve.setProperty("classpath.resource.loader.class", ClasspathResourceLoader.class.getName());

        ve.init();
        
        String environment = System.getProperty("mule.env");
        
        emailInfo.put("environment", environment);

        VelocityContext context = new VelocityContext();
        context.put("emailInfo", emailInfo);

        Template t = ve.getTemplate("email-notification-template-velocity.vm" );

        StringWriter writer = new StringWriter();

        t.merge( context, writer );

        logger.info( writer.toString() );
        
        return writer.toString();
    }
}

Wednesday, February 21, 2018

Introduction To Mule API Security - Client ID Enforcement

Introduction

In my last article, I have introduced the procedures of creating a simple api and applying basic authentication to mule application. I am going to introduce another simple API security mechansim for mule application - Client ID Enforcement.

Both Basic Authentication and Client ID Enforcement are simple security mechanisms. Combining with Https, they can provide basic security for most applications. Nowadays, oauth2 is more popular security scheme for API security. I will cover that in my later post.

The complete source for this post are available at my github: https://github.com/garyliu1119/api-manager-explained

Setup In Anypoint Platform

First I create a new API project, namely, accounts-manager as shown in the following snapshot:

#%RAML 1.0
title: Account Api
version: 1.0.1
protocols: [ HTTP, HTTPS ]
baseUri: http://esb.ggl-consulting.com/{version}
mediaType: application/json

traits: 
  client-id-required:
      queryParameters:
        client_id:
          type: string
        client_secret:
          type: string
types: 
  Account:
    properties: 
      id: integer
      type: string
      name: string
  Error:
    properties: 
      code: integer
      errorMessage: string

/accounts:
  /{id}:
    get:
      is: [client-id-required]
      description: get an account information by id
      responses: 
        200:
          body: 
            application/json:
              type: Account
              example: { "id": 1234, "name": "Gary Liu", "type": "checking" }

After save the API, we need to publish the API to Exchange. In the exchange, we need to request access. By doing this we get client ID and client secret as shown in the following snapshot:

These client ID and client secrets will be available to the customers who consumes the API. These values can (should) be reset periodically.

To apply security scheme of client id enforcement, we can check the radio button of "Client ID enforcement" as shown below:

The easiest way is take the default configuration of "Custom Expression" as shown below:
That is all we need to do on the Anypoint Platform. Next, I will demonstrate the procedures to setup Mule applications.

Setup In Mule Application

The setup for the Mule application is the same as those shown in the simple security. We need to create a new Autodiscovery component like the following:


Invoke Application

To invoke the application, we need to pass the client_id and client_secret paraters as query parameters as shown in the following snapshots:

Client ID and Secret As Header

In the above section, I have demonstrated the simple way to pass client id and client secret. That is pass the client id and secret as query parameters. Apparently, this is not secure. The alternative is to pass the encrypted client id and secret as headers. The configuration is shown as the following:

There is no changes on application. The only change is how the client invoke the application. Consumers will need to invoke the application with the way as shown below:

Summary

In this post, I have demonstrated the procedures to applying security policy of client ID enforcement. There are two ways to do so:
  1. Custom configuration: passing client_id and client_secret as query parameters of headers
  2. Passing client id and secret as base 64 encrpted header
The second approach is recommended as it is more secure.

Monday, February 19, 2018

Introduction To Mule API Security - Simple Authencation

Introduction

This post covers the basic procedures to setup simple Mule API security. I assume that the audience have not knowledge of applying API Security on the Mule AnyPoint Platform. Here are the key take-aways

  1. Write a simple RAML in the Design Center of the Anypoint Platform
  2. Publish the API (RAML) to the Exchange
  3. Using API Manage to apply simple security
  4. Explain the details on how it works

The complete source code are available at my github: https://github.com/garyliu1119/api-manager-explained

Design & Publish API

In the new version of AnyPoint Platform, the api management contains 3 separate areas:

  1. Design Center
  2. Exchange
  3. API Manager

There are many editors we can use to design our API (RAML). I find design center and ATOM are the two most powerful tools. Both are easy to use. For the demo purpose, I use AnyPoint Platform's Design Center. First, create a new project as shown in the snapshot below:

Choose "API Specification", enter project name, then you can write your API in RAML. The details can be found in many documents. The code below is the simplest RAML file for the purpose of demonstrate API security.

#%RAML 1.0
title: Basic Auth API
version: v1
protocols: [ HTTP ]
baseUri: https://mocksvc.mulesoft.com/mocks/09212943-e570-413d-92f6-ef5e634f33cb/{version}  # baseUri: http://esb.ggl-consulting.com/{version}
mediaType: application/json
securitySchemes: 
  basicAuth:
    description: First simple auth
    type: Basic Authentication
    describedBy: 
      headers: 
        Authorization:
          description: Base64-encoded "username:password"
        type: string
      responses: 
        401: 
          description: |
            Unauthorized: username or password or the combination is invalid
types: 
  Account:
    properties: 
      id: integer
      type: string
      name: string
  Error:
    properties: 
      code: integer
      errorMessage: string

/accounts:
  /{id}:
    get:
      description: get an account information by id
      responses: 
        200:
          body: 
            application/json:
              type: Account
              example: { "id": 1234, "name": "Gary Liu", "type": "checking" }

Once the API is completed, we need to published the api to the Exchange. To publish the API to Exchange, refer the snapshot below:

Now, we can view our API in the Exchange as shown in the following snapshot:

Once the API is published to the Exchange, we can go to API Manager to import the API as shown in the following snapshot:

We can view the API as shown in the following snapshots:

By viewing API, we need few important information for the purpose of auto-discovery. The Mule 3, we need "API Name" and "API Version", respectively. For Mule 4, we need API ID.

Setup The AnyPoint Studio

In order to apply the security policy to our local running applications, we need to connect our local runtime with Anypoint Platform. To do so, we need to apply client ID and client secret of our environment to the Anypoint Studio. Firsly, we need to get the client id and client secret: Access Management --> Environment (left panel) --> Environemnt (Sandbox):

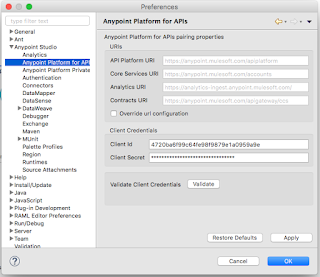
Now, go to AnypointStudio, Preference --> Anypoint Platform For Apis --> fill the client id and client secret --> Validate:

Once you validate the client id and client secret, that means our AnypointStudio or the embedded runtime can communicate with the Anypoint Platform.

Apply Security Policy In API Manager

Once the API is imported to the API Manager, we can apply the security policies, SLA Tier, alert, etc. The main purpose of this post is to demo how to apply security policies. I will cover the other area in the later posts. In this case, I plan to apply simple security and Basic Http Authentication as shown in the following snapshot:

When you apply the simple security, the platform will ask for the user name and password. Note down these credentials, we will need them when we perform the http request.

At this point, we have setup the security for the API from administrative side. Now, we need to apply the security policy (user name and password) to our application. I will cover these in the next section.

Apply Security Policy To Mule Application Using Auto Discovery

The key to control application API access is via auto-discovery and communication between API Manager and application. To achieve auto-discovery of the application, or to let api manager control the application access, we need to create an auto-discovery component as shown in the following snapshots:


The apiName and version are from API Manager as shown in the following snapshots:
The apikitRef is our definition of API Router as shown in the following snapshots:


As we can see that the security policy will apply and api passing through the api router, which is referring our API definition of api-manager-explained.raml

Run The Application

To test the security policy applying to our application, we can use PostMan as shown in the following snapshots:

The Authorization is "Basic Auth", the user name and password are shown. PostMan will automatically generate the token which is base64. And PostMan will send Authorization : [{"key":"Authorization","type":"text","name":"Authorization","value":"Basic R2FyeTEyMzQ6R2FyeTEyMzQk"...] to the server.

We can also perform the same using curl. First we need to generate the basic token as the following:

gl17@garyliu17smbp:~$ echo "Gary1234:Gary1234$" | base64
R2FyeTEyMzQ6R2FyeTEyMzQkCg==
gl17@garyliu17smbp:~$ 

Then, we can send the request as the following:

curl -X GET -H "Authorization: Basic R2FyeTEyMzQ6R2FyeTEyMzQk" http://localhost:18081/api/accounts/1234

That is it. Even though it seems pretty complicated, actually this is simplest mechanism.

What Is Under The Hood?

At this point, we may ask ourselves the question: How does it work? How the Anypoint Platform enforce the security policies?

First of all, we noticed that when we run the application in our local, in our console, there are following lines:

The highlighted line showing that the policy has been applied successfully.

In the meantime, there is a file written in our workspace/.mule/http-basic-authentication-282686.xml as shown in the following snapshot:

And the contents of the file are the following:


As you can see, Mule is using spring security. Actually, we can do the exactly same in our mule configuration. Of course, I am not recommending to do so.

Another interesting point should be noted is the network connection. Here is what I can see from my local environment by using the command of lsof:

AnypointS  987 gl17   98u  IPv6 0x3c5bcba541fe6469      0t0  TCP localhost:50687->localhost:6666 (ESTABLISHED)
AnypointS  987 gl17  223u  IPv6 0x3c5bcba541fe9269      0t0  TCP localhost:50681->localhost:50683 (ESTABLISHED)
java      1107 gl17    4u  IPv4 0x3c5bcba53fdc68b1      0t0  TCP localhost:50683->localhost:50681 (ESTABLISHED)
java      1107 gl17  498u  IPv4 0x3c5bcba5417148b1      0t0  TCP localhost:6666->localhost:50687 (ESTABLISHED)
java      1107 gl17  526u  IPv4 0x3c5bcba544131211      0t0  TCP garyliu17smbp.frontierlocal.net:50927->ec2-34-231-107-145.compute-1.amazonaws.com:https (ESTABLISHED)
The last line shows the TCP connection between Anypoint Platform and my local runtime.

Summary

In this post, I have shown the details of setup and applying API security to mule applications. I covered the underneath communication between local runtime and Anypoint Platform. In the following post I will cover client ID enforcement, another simple security mechanisms. At the end of this series, the reader should be able to master the API security related to the mule platform.

Saturday, January 27, 2018

Test API Using Postman 101

Introduction

You can also read this post at DZone

Postman is one of the most efficient application to test RESTful api. Most developers write simple test and check the result of REST API. That is fine for few API, but if we have many api to test. It is better to automate these test cases. This post is an introduction to the automated testing using a simple api. There is command line version of Postman. It is called newman. I will also cover the procedure to test using newman.

The main topic of this post covers:

  • Environment
  • Simple Test Scripts
  • Setup newman
  • Test Collections

Environment And Collections

In general, you should create one testing collection for each functional area, which may have many testing case. Then, you should create environment for dev, test, sit, prod, etc, as each environment may have different configuration.

Simple Test Scripts

For the demonstration purpose, I created two test cases. The first is to get oauth2 token from my local server. The second is to validate the token. To validate the token, I will need to pass the token as query parameters. To copy and paste the token into the query parameters is not practical. In this case, I create and environment variable named: access-token-password in the first test case. And pass this variable to the second test case as the following:

https://localhost:8082/external/validate?access_token={{access-token-password}}
The syntax is self-explanatory.

The following are the details about the test script:

var jsonData = JSON.parse(responseBody);

postman.setGlobalVariable("access_token", jsonData.access_token);

postman.setEnvironmentVariable("access_token", jsonData.access_token, "OATH2");

postman.setEnvironmentVariable("access-token-password", jsonData.access_token, "OAUTH2");

tests["access_token is not null"] = jsonData.access_token !== null;

tests["token_type == bearer"] = jsonData.token_type === "bearer";

As you can see, the test script is in the form of javascript. And the meanings for each line are self-explanatory as well. I set the environment variable "access-token-password" for the environment of OAUTH2.

The following picture shows the collection, testing scripts, and the test case output

To run the the test for the collection, click the arrow, then run as show from the following picture:

From the above pictures, we see that we can run the test cases by one click and verify if all the test cases are passed. However, this kind of testing is still very much manual. We need to automated the whole procedures automatically. For this purpose, we can use the command line version of the Postman, namely, newman

Using newman

In order to use new man, we need to do three things:

  • Install newman
  • Export the collection
  • Export the environment variables

Install newman

npm install newman --global;

Export Test Collection

right click 3 dots beside the collection:
Then click Export --> Export. Save the file.

Export Environment Variables

client the tool picture on the top-right of the gui, find the collection, click the download button, as shown in the following picture:
In my cases, for the demo purpuse, I save the two files in the Download directory.
-rw-------@  1 gl17  staff   3.4K Jan 27 12:34 oauth2-demo.postman_collection.json
-rw-------@  1 gl17  staff   653B Jan 27 12:35 OAUTH2.postman_environment.json

Run Collection From Command Line

The following are the command lines:
gl17@GaryLiu17sMBP:~/Downloads$ newman run oauth2-demo.postman_collection.json  -e OAUTH2.postman_environment.json --insecure 
newman

oauth2-demo

→ username&password
  POST https://localhost:8082/external/access_token?grant_type=password&username=max&password=mule [200 OK, 374B, 402ms]
  ✓  access_token is not null
  ✓  token_type == bearer

→ https://localhost:8082/external/validate?access_token=3URNgv-o3Tu9pP9WNfEhewlrBba7CsUfwJM1nZYYq8n7SlhxWq5E13wMy2ZeOcFx2q4edPSgG7u61Hg3_rFSpQ
  GET https://localhost:8082/external/validate?access_token=raJ1KXUBR4GfbVXNBFHNcAnNUQgQ34wcZ_jo0KODNdUmX4N4Th279THfZNPkCEmKQs2mOng9zcX97DMJtIsl-A [200 OK, 171B, 5ms]
  ✓  client_id is not null
  ✓  access-token-password is not null
  ✓  Status code is 200

┌─────────────────────────┬──────────┬──────────┐
│                         │ executed │   failed │
├─────────────────────────┼──────────┼──────────┤
│              iterations │        1 │        0 │
├─────────────────────────┼──────────┼──────────┤
│                requests │        2 │        0 │
├─────────────────────────┼──────────┼──────────┤
│            test-scripts │        2 │        0 │
├─────────────────────────┼──────────┼──────────┤
│      prerequest-scripts │        0 │        0 │
├─────────────────────────┼──────────┼──────────┤
│              assertions │        5 │        0 │
├─────────────────────────┴──────────┴──────────┤
│ total run duration: 529ms                     │
├───────────────────────────────────────────────┤
│ total data received: 345B (approx)            │
├───────────────────────────────────────────────┤
│ average response time: 203ms                  │
└───────────────────────────────────────────────┘
gl17@GaryLiu17sMBP:~/Downloads$ 

That is it all. Pretty simple and straight forward.

Summary

In this post, I have covered the following topics:

  • Procedures to test RESTful API using postman and newman utilities.
  • Simple syntax on how to write test javascripts

Anypoint Studio Error: The project is missing Munit lIbrary to run tests

Anypoint Studio 7.9 has a bug. Even if we following the article: https://help.mulesoft.com/s/article/The-project-is-missing-MUnit-libraries-...