The video for this tutorial can be found at this link: this link
This tutorial teaches you how to create JPA maven project from scratch, and generate Hibernate entities. It contains three parts:
Create a simple maven project
Convert a maven project to JPA facet
generate Hibernate entities
In this tutorial, I am using JBoss Studio 7.1. You can use STS, or Eclipse Kepler.
During my working process, I have seen and experience many problems with this kind of procedures. In general, it is caused by configuration problem. If you encounter similar issues, the best way is to create a project from scratch and follow the procedures provided in this tutorial.
Create A Simple Maven Project
File -> New -> Maven, select Maven Project as shown in the next figure:
click Next and check the check box of "create a simple project" as shown in the next figure:
click Next and file the group ID and artifact ID as the following, or whatever you choose, as shown in the next figure
click Finish. You should the the new project created and with the following standard maven project layout:
At this point, we have created a new maven project. One thing you you may noticed is the JRE System Liberay is J2SE-1.5. We will need to change this to 1.7. In order to do so we need to update our pom.xml file.
In this tutorial, I am using JTDS driver for MSSQL server. Thus, we need to update the maven project to add all the dependencies required as shown in the next figure:
Save the the pom.xml file and update the maven project. You will that the JRE System Library is 1.7 now. At this point, we have a create a project with all necessary libraries for the JPA project with JTDS driver.
In the next session, we will convert the maven project to a JPA project.
Configure The Maven Project To JPA Project
Right click the JPA-Hibernate project, choose Properties -> Project Facets, you will see the following figure:
click the link: convert to faceted form (Note: we are going to convert the simple maven project to a JPA project)
check the JPA in the "project facet" panel and select the runtime as shown in the next figure
Now click Further configuration available... link. The JPA facet configuration will shown as the following:
click the link: add connection...
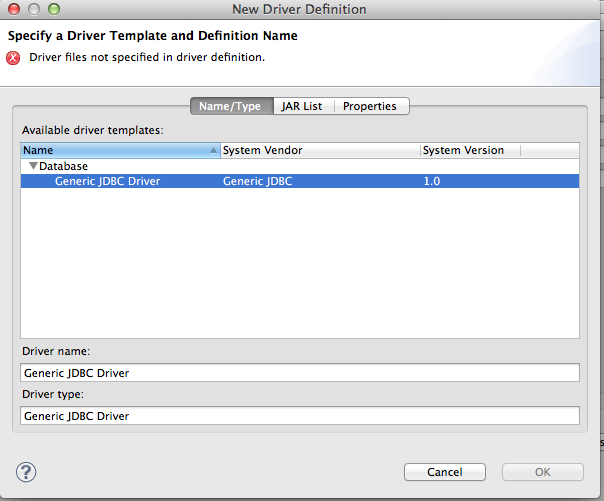
select Generic JDBC connection profile as show below
Note: I have named the connection name as JTDS-DEV. You can give any meaningful name you prefer
click Next, you show see a new page looks like the following [In my case, as I have already define a connection, many fields are populated. Don't worry about them for now]
On the right top, there is a simple you can configure the new driver, click it. You will see the following figure:
add the jtds jar file as shown in the following figure:
click the properties panel and file the connection properties [here is my example, you should get this for your own]
click OK
Note that, the IDE complaining that I have already have a driver name. We will have to give a new name as the following:
Now, we will be back to the main configuration page. fill the password and test the connection. Make sure you can connection to the targeted database.
click Next to verify the configuration. Or you can click Finish. Now click OK to all the pages, then our project is setup
Now in the package explorer, you will see a new file: persistence.xml is created. We will need to add connection information to the file. open the file: persistence.xml. In the xml overview page, you will see a connection button. click it
In that page, select transaction type as: Resource Local, then populate the JDBC connection properties from the existing connection as shown in the following figure:
Now the persistence.xml file will have the following contents:
,
At this point, we have successfully configured the JPA project. Next, we will generate entities from the database table
Generate Hibernate Entities From Database Tables
right click on JPA-Hibernate Project -> JPA Tools -> Generate Entities From Tables. You will see the following page:
Now select tables you want to generate entities. In my case, I select all of them.
click Next
You should see a mapping page. Then click Next
You will see a page you can configure the source folder for the entities you will generate. As we have already configure this, just click Next.
The new page you see will look like the following
This page is important for the mapping. Most databse table's name will be long and not following the Java class naming convention. In this page, we will change the Java class name as shown below:
As you can see, I have the class name of EligibilityAllianceAssociations.java to the table of Alliance_Association_c.
At this point, we are done with the procedures for the purpose of generating the java entities from database tables.
Trouble Shooting
A very common problem with entity generation is in the JPA configuration. Note that the default catalog is Master. In our database, it is ESM as shown in the following figure:
Make sure you check this page very carefully, if you cannot generate entities.
Conclusions
To generate entities from database tables in the JPA project, the most important procedure is to test the JDBC connection using tools like Squirrel, sqldeveloper, SQLService client, etc. Once the connection is test, you can setup the JPA project either from scratch as shown in the article, or you can create JPA project from STS of Jboss Developer Studios.
I mistakenly deleted a folder vendor under web project. Now I need to recover files back except socket
Procedures:
# List file deleted from gitHub. In this case, all my files are under vendor dir
git log --diff-filter=D --summary | grep delete   | egrep vendor > deletedFiles.txt

#prepare a script to check out the deleted files [which I am interested]
for file in $(cat deletedFiles.txt)\
do \
     echo git checkout $(git rev-list -n 1 HEAD -- "$file")^ -- "$file"; done | egrep vendor > getBackFiles.sh \
done

# change file permission so that I can run
chmod 755 getBackFiles.sh

# run the script created
./getBackFiles.sh