It is very easy to install and configure. Thank you Julien Robert!
It allows to control multiple machine using one pair of keyboard and mourse
You can drag and drop files from one machine to another. Beautiful!
Introduction
For those people like me who have at least one MacBook pro and iMac, thunderbolt display, it is desirable to use one keyboard and one mouse to control both machines. And to drag and drop files from one mac to another. Teleport is the solution! Teleport is developed at Abyssoft by Julien Robert. The current version is 1.1.3.
Download Teleport
The zip format file can be downloaded from http://www.abyssoft.com/software/. you can unzip the file teleport.zip by the following command on terminal:
unzip teleport.zip
After you unzip the file, a folder of teleport will be created with the following contents:
As you can see, there are 2 files underneath it. One is a pdf file with brief description on how install and configure the teleport and the other is a folder contain all the contents of the software.
Remember, you have download and configure the teleport on all the mac machines you want to control
The current version does not work out of box you have to perform the following procedures
In Finder navigate to teleport folder
Right or control click for context menu and "Show Contents"
Navigate to "Resources" folder and copy "teleportd.app" to your desktop (don't move it just copy it)
double click teleport.prePane
check the "activate" box
Go to Security & Privacy to Accessibility area
Hit the plus at the bottom of the list and navigate to the desktop and add teleportd.app
After the configuration, you should see the following in your System Preferences panel:
Once you have perform this procedures on all of you machines, you should be able to control your machine with only one keyboard and one mouse.
It seems the last activated machine will be the master. Now you can drag and drop files from one machine to another. It is really beautiful!
If you have 2 sets of keyboard and mouse, and you want to control each other, you can set the layout the same for both machine as shown in the following figure.
Nexus is the best java artifact repository management software so far as I know. Enterprise software development shop should use repository management system to proxy the outside world repository and also to manage the life cycle of their internal software.
This article will walk you through the fundamental process to install, start Nexus, and deploy an maven artifact to the Nexus repository.
For the complete reference, you may take a look at this reference book. Personally, I don't like this kind of reference. Nowadays, who has the time to read through the whole books?
Download nexus-2.11.0-02-bundle.tar.gz (this is the current version)
cd ; mkdir nexus ; cd nexus
tar xvzf ~/Downloads/nexus-2.11.0-02-bundle.tar.gz
Now I can the the following contents:
[/Users/Gary2013/nexus/nexus-2.11.0-02]$ ls
LICENSE.txt NOTICE.txt bin  conf  lib  logs  nexus  tmp
At this point the installation is done. we can start the Nexua OSS by:
cd bin
./nexus start
Configure Nexus OSS
By default, Nexus use http port 8081. You can open a browser and go to http://localhost:8081/nexus
Once the default Nexus page is rendered, you can login in using the default admin:
username: admin
password: admin123
Nexus has preconfigured a deployment user with:
username: deployment
password: deployment123
First thing I did is to add a new uer [from left panel -> security] as shown in the following figure:
Configure Maven
In order to deploy java artifacts to Nexus Repository, we will need to update maven configuration file ~/.m2/setttings.xmls
deploymentdeploymentdeployment123garygarygary1234
Project Configuration To Use Local Nexus
After Nexus starts, we need to configure our project to be deployable to the Nexus repository. Here is all we need to do in our pom.xml file
If you look at the Nexus repository, you will find releases and snapshots as shown in the following figure:
The question is how does maven know into which repository the artifacts should be put? The answer is that in our version tag. If we put the version like:
0.0.2-SNAPSHOT
The maven will put the artifact into snapshots repository. If the version has no SNAPSHOT, the artifacts will be put into release repository
While I was working on my SpringMVC project, I was trying to test jsonPath and encounter is problem. Here is the Stacktrace which I run the JunitTest:
java.lang.NoSuchMethodError: com.jayway.jsonpath.JsonPath.compile(Ljava/lang/String;[Lcom/jayway/jsonpath/Filter;)Lcom/jayway/jsonpath/JsonPath;
 at org.springframework.test.util.JsonPathExpectationsHelper.(JsonPathExpectationsHelper.java:54)
 at org.springframework.test.web.servlet.result.JsonPathResultMatchers.(JsonPathResultMatchers.java:43)
 at org.springframework.test.web.servlet.result.MockMvcResultMatchers.jsonPath(MockMvcResultMatchers.java:196)
 at com.ggl.springmvc.BlogEntryControllerTest.test(BlogEntryControllerTest.java:40)
 at sun.reflect.NativeMethodAccessorImpl.invoke0(Native Method)
 at sun.reflect.NativeMethodAccessorImpl.invoke(NativeMethodAccessorImpl.java:57)
 at sun.reflect.DelegatingMethodAccessorImpl.invoke(DelegatingMethodAccessorImpl.java:43)
 at java.lang.reflect.Method.invoke(Method.java:606)
 at org.junit.runners.model.FrameworkMethod$1.runReflectiveCall(FrameworkMethod.java:47)
 at org.junit.internal.runners.model.ReflectiveCallable.run(ReflectiveCallable.java:12)
 at org.junit.runners.model.FrameworkMethod.invokeExplosively(FrameworkMethod.java:44)
 at org.junit.internal.runners.statements.InvokeMethod.evaluate(InvokeMethod.java:17)
 at org.junit.internal.runners.statements.RunBefores.evaluate(RunBefores.java:26)
 at org.junit.runners.ParentRunner.runLeaf(ParentRunner.java:271)
 at org.junit.runners.BlockJUnit4ClassRunner.runChild(BlockJUnit4ClassRunner.java:70)
 at org.junit.runners.BlockJUnit4ClassRunner.runChild(BlockJUnit4ClassRunner.java:50)
 at org.junit.runners.ParentRunner$3.run(ParentRunner.java:238)
 at org.junit.runners.ParentRunner$1.schedule(ParentRunner.java:63)
 at org.junit.runners.ParentRunner.runChildren(ParentRunner.java:236)
 at org.junit.runners.ParentRunner.access$000(ParentRunner.java:53)
 at org.junit.runners.ParentRunner$2.evaluate(ParentRunner.java:229)
 at org.junit.runners.ParentRunner.run(ParentRunner.java:309)
 at org.eclipse.jdt.internal.junit4.runner.JUnit4TestReference.run(JUnit4TestReference.java:50)
 at org.eclipse.jdt.internal.junit.runner.TestExecution.run(TestExecution.java:38)
 at org.eclipse.jdt.internal.junit.runner.RemoteTestRunner.runTests(RemoteTestRunner.java:459)
 at org.eclipse.jdt.internal.junit.runner.RemoteTestRunner.runTests(RemoteTestRunner.java:675)
 at org.eclipse.jdt.internal.junit.runner.RemoteTestRunner.run(RemoteTestRunner.java:382)
 at org.eclipse.jdt.internal.junit.runner.RemoteTestRunner.main(RemoteTestRunner.java:192)
Solution
The reason for this is the incompatibility between json-path 1.1 and hamcrest-library 1.3. To fix this, simple change the version of json-path from 1.1.0 to 0.9.1
I have been using Tomcat on and off for the last 10 years. It is a great application server with respect to easy use and functionality. As I am developping an AngularJS project, I decided to use Tomcat as my server platform. This blog is to describe how to install the newly available Tomcat on MacOS.
Currently I am using OSX 10.9.5, as show in the figure below
Now copy the MD5 signature from apache tomcat's web site and compare the string. Here the script I used:
if [[ 96063b1e477869e8ff4801d777e8915b == 96063b1e477869e8ff4801d777e8915b ]] ; then echo "OK No Problem"; else echo "Wrong File"; fi
Install Tomcat
Now, execute the following procedures:
cd ~
mkdir Tomcat
cd $_
tar -zvxf ~/Downloads/apache-tomcat-8.0.14.tar.gz
cd apache-tomcat-8.0.14/bin
./startup.sh
Now the tomcat is started. You can check the log file at $INSTALL_DIR/logs/catalina.out. And you can also use web browser to verify if you can load the tomcat's home page at http://localhost:8080.
In my previous blog , I have explained the procedures to install and start JBoss FSW as a stand alone server. This article explains the process to build, deploy, Test, and Debug applications for JBoss FSW. After reading this, you, as a JBoss FSW developer, should be able to start develop integration applications based on the platform of JBoss FSW. For those who have used JBoss Development Studio before, this is an easy process. The only thing you need to do is to change the run time server from previous runtime server to the newly installed JBoss FSW.
Install JBoss Development Studio
The details about installation of JBDS is cover in Chapter 7 of this document.
After installing the JBDS, you need to install the runtime server. In my case, I installed my JBoss FSW at /Users/Gary2013/JBoss-FSW/. I call this FSW_HOME. Make sure you have the JBOSS_HOME defined as $FSW_HOME/jboss-eap-6.1. You may also build quickstarts examples from command line.
Import Quickstarts Project to JBDS
I have imported the follow project to my workspace
Modify pom.xml
The example comes with pom.xml with JDK 1.6. We need to change it to 1.7. Looking for 1.6 in the pom.xml file and change the two places to 1.7. You may see error. In this case, you need to update the maven project
Add JBoss FSW Server
Remove The Existing Server
You may have default runtime server, remove it.
Add JBoss FSW Runtime Server
File-->New--Other [or Command-N for macos], the type ser on search panel, you should see the following:
click Add button:
Click 6.1+ Runtime and Next
Select Configuration File. The configuration file is under $JBOSS_HOME/standalone/configuraiton/standalone-full.xml.
click Finish.
Now, your JBDS is configured to run applications on JBoss FSW runtiem. If you have already deployed the switchyard remote invoker project, remove it from the admin console.
Now, let's add the project to the runtime:
Run The Servier
Now we can run the server in either default running mode or in debug mode by click the bug button:
First let's run the server in normal mode. If you run into problem, such as, server cannot start. do the following:
shutdown studio
make sure there is not FSW runtime is running by run ps -eaf | egrep java
run the server outside studio by cd $JBOSS_HOME/bin, standalone.sh -c standalone-full.xml
If above procedure is all good, your application may be deployed to the runtime. There are two ways to deal with this kind of problem. The first is to go to $JBOSS_HOME/standalone/deployment. Make sure the remote-invoker jar file is not presented in the deployment dir. The other is start studio, from add/remove page to remove the war or jar file you are about to deploy.
If everything works, you should be able to see the following from the admin console:
Now, let's test the application from the studio. Do the following:
open the file: RemoteClient.java
run this client
You should see the following:
Now, you are in business!
Run Maven Project From Terminal
During our installation of FSW, we should tell the install where is our maven setting. If the setting is correct, you should be able to run mvn install command. You may take a look at your ~/.m2/settings.xml file. The RedHat related profile is added.
The targeted reader for this article is for architects and developers who want to use JBoss Service Workss as integration platform. JBoss Service Works (JSW) is build on top of JBoss EAP and JBoss Fuse, together with Apache projects like Apache Camel, Apache CXF, Apache ActiveMQ, etc. I will focus on the new functionalities provided by JSW.
Installation
Installation Document can be found at this link Unfortunately, this document is not well written. I will provide simplest instructions here for those who are not patient to read all the sections of the document.
download Red Hat JBoss Fuse Service Works jar file from here.
If the FSW started properly, you should see the following line in the stdout:
13:27:16,823 INFO [org.jboss.as] (Controller Boot Thread) JBAS015951: Admin console listening on http://127.0.0.1:9990
The default page can accessed via: http://localhost:8080. On this page, you can click the link "Administration Console", login as
User Name: admin
Password: admin123!
If you have used JBoss EAP, this admin console page should be familiar to you. JBoss FSW added SwitchYard tab as shown in the following diagram: [note: I have deployed remote-invoker application. I will cover this later]
Important Server Information
Once you start the server, you should see the following information
The Jboss studio is a eclipse! Not much difference if you know eclipse.
Start Multiple Runtimes
Run Multiple JBoss 7 Instances on the same server
Start Server with all port adding 1000 ./standalone.sh -Djboss.socket.binding.port-offset=1000
Run Server in the background
nohup ./standalone.sh -Djboss.socket.binding.port-offset=1000 >$JBOSS_HOME/log/standalone.log 2>$JBOSS_HOME/log/jboss.out &
In many enterprise applications, in particular, those involving database retrievals, to obtain objects from sources like database for every filtering, sorting, is expensive, slow, sometimes, impractical. Therefore, caching is a preferred solution. There are two categories of caching with regards to application address spaces, in-process and distributed. This article provides a tutorial for using Google Guava's library for in-process caching. For distributed caching, the memcachedached is popular solution. Ehcache from Terracotta is a product that can be configured to function both for in-process and distributed caching.
The source code for this tutorial can be found at my GitHub repository at Guava-Cache Project
Project Dependency
In order to use the Google Guava API, we need to add the following maven dependency to our project:
com.google.guavaguava17.0
Google Guava API
The caching interface is named LoadingCache in the following form:
public interface LoadingCache extends Cache, Function
{
    V get(K key) throws ExecutionException;
    V getUnchecked(K key);
    ImmutableMap getAll(Iterable keys)
        throws ExecutionException;
    void refresh(K key);
    ConcurrentMap asMap();
}
This interface inherit the Cache interface which has the following methods:
public interface Cache {
     @Nullable
     V getIfPresent(Object key);
     V get(K key, Callable valueLoader) throws ExecutionException;
     ImmutableMap getAllPresent(Iterable keys);
     void put(K key, V value);
     void putAll(Map m);
     void invalidate(Object key);
     void invalidateAll(Iterable keys);
     void invalidateAll();
     long size();
     ConcurrentMap asMap();
     void cleanUp();
}
Put API In Use
The use cases for caching, typically, are:
add key - value pair
add more then one key-value pairs
retrive by key
retrive multiple values by multiple keys
retrive all
refereshing
clear the caching
Instantiate A Cache
Here is the snippet on how to instantiate a cache instance. In spring framework, you can let the framework to take care the instantiation, but the gist is the same:
In the about code, I define the cache for maximum size of 1000, and the other eviction policy, say, expire after 1 day of writing, expire after 1 day of access. The loader define how to load the entries to the cache as explained in the next section.
Put Key-Value Pair To Cache
You may first think to use put(K, V) method. This is really not correct way. Guava API provides a CacheLoader abstract class. We can extend this by proving implementation of load methods as the following:
public class EmployeeCacheLoader extends CacheLoader>{
	private EmployeeDao employeeDao;

	public EmployeeCacheLoader() {
		this.employeeDao = new EmployeeDao();
	}

	@Override
	public Optional load(String name) throws Exception {
		return Optional.fromNullable(employeeDao.getEmployeeByName(name));
	}

}
The load method defines how we put the K-V pair into cache if the K-V does not present in the cache.
Clearing Cache
Guava API provides few option to clear caching as the following:
invalide(key): clear single cache by the key
invalide(keys): clear multiple cache by keys
invlideAll(): clear all caches>
Sometimes, we may need to clear all caches based scheduling. In that case, Apache Camel's timer or Quartz api can be considered.
The video for this tutorial can be found at this link: this link
This tutorial teaches you how to create JPA maven project from scratch, and generate Hibernate entities. It contains three parts:
Create a simple maven project
Convert a maven project to JPA facet
generate Hibernate entities
In this tutorial, I am using JBoss Studio 7.1. You can use STS, or Eclipse Kepler.
During my working process, I have seen and experience many problems with this kind of procedures. In general, it is caused by configuration problem. If you encounter similar issues, the best way is to create a project from scratch and follow the procedures provided in this tutorial.
Create A Simple Maven Project
File -> New -> Maven, select Maven Project as shown in the next figure:
click Next and check the check box of "create a simple project" as shown in the next figure:
click Next and file the group ID and artifact ID as the following, or whatever you choose, as shown in the next figure
click Finish. You should the the new project created and with the following standard maven project layout:
At this point, we have created a new maven project. One thing you you may noticed is the JRE System Liberay is J2SE-1.5. We will need to change this to 1.7. In order to do so we need to update our pom.xml file.
In this tutorial, I am using JTDS driver for MSSQL server. Thus, we need to update the maven project to add all the dependencies required as shown in the next figure:
Save the the pom.xml file and update the maven project. You will that the JRE System Library is 1.7 now. At this point, we have a create a project with all necessary libraries for the JPA project with JTDS driver.
In the next session, we will convert the maven project to a JPA project.
Configure The Maven Project To JPA Project
Right click the JPA-Hibernate project, choose Properties -> Project Facets, you will see the following figure:
click the link: convert to faceted form (Note: we are going to convert the simple maven project to a JPA project)
check the JPA in the "project facet" panel and select the runtime as shown in the next figure
Now click Further configuration available... link. The JPA facet configuration will shown as the following:
click the link: add connection...
select Generic JDBC connection profile as show below
Note: I have named the connection name as JTDS-DEV. You can give any meaningful name you prefer
click Next, you show see a new page looks like the following [In my case, as I have already define a connection, many fields are populated. Don't worry about them for now]
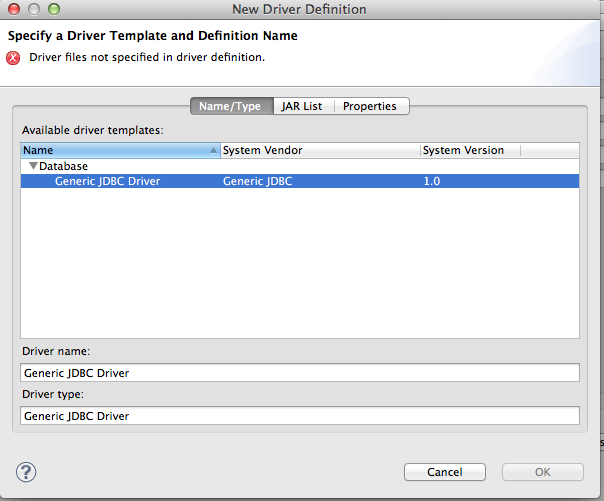
On the right top, there is a simple you can configure the new driver, click it. You will see the following figure:
add the jtds jar file as shown in the following figure:
click the properties panel and file the connection properties [here is my example, you should get this for your own]
click OK
Note that, the IDE complaining that I have already have a driver name. We will have to give a new name as the following:
Now, we will be back to the main configuration page. fill the password and test the connection. Make sure you can connection to the targeted database.
click Next to verify the configuration. Or you can click Finish. Now click OK to all the pages, then our project is setup
Now in the package explorer, you will see a new file: persistence.xml is created. We will need to add connection information to the file. open the file: persistence.xml. In the xml overview page, you will see a connection button. click it
In that page, select transaction type as: Resource Local, then populate the JDBC connection properties from the existing connection as shown in the following figure:
Now the persistence.xml file will have the following contents:
,
At this point, we have successfully configured the JPA project. Next, we will generate entities from the database table
Generate Hibernate Entities From Database Tables
right click on JPA-Hibernate Project -> JPA Tools -> Generate Entities From Tables. You will see the following page:
Now select tables you want to generate entities. In my case, I select all of them.
click Next
You should see a mapping page. Then click Next
You will see a page you can configure the source folder for the entities you will generate. As we have already configure this, just click Next.
The new page you see will look like the following
This page is important for the mapping. Most databse table's name will be long and not following the Java class naming convention. In this page, we will change the Java class name as shown below:
As you can see, I have the class name of EligibilityAllianceAssociations.java to the table of Alliance_Association_c.
At this point, we are done with the procedures for the purpose of generating the java entities from database tables.
Trouble Shooting
A very common problem with entity generation is in the JPA configuration. Note that the default catalog is Master. In our database, it is ESM as shown in the following figure:
Make sure you check this page very carefully, if you cannot generate entities.
Conclusions
To generate entities from database tables in the JPA project, the most important procedure is to test the JDBC connection using tools like Squirrel, sqldeveloper, SQLService client, etc. Once the connection is test, you can setup the JPA project either from scratch as shown in the article, or you can create JPA project from STS of Jboss Developer Studios.
I mistakenly deleted a folder vendor under web project. Now I need to recover files back except socket
Procedures:
# List file deleted from gitHub. In this case, all my files are under vendor dir
git log --diff-filter=D --summary | grep delete   | egrep vendor > deletedFiles.txt

#prepare a script to check out the deleted files [which I am interested]
for file in $(cat deletedFiles.txt)\
do \
     echo git checkout $(git rev-list -n 1 HEAD -- "$file")^ -- "$file"; done | egrep vendor > getBackFiles.sh \
done

# change file permission so that I can run
chmod 755 getBackFiles.sh

# run the script created
./getBackFiles.sh
This article is a continuation of my post on how to develop a RESTful web service. In this one, I am going explain the procedure to develop, build, and test a SOAP base web service. The deployment environment is OSGi container as Talend ESB 5.3.1. The bundle developed here can be deployed to any OSGi container like JBoss Fuse, ServiceMix, etc. With minor modification, it can also be deployed to Tomcat container.
There are two approaches to develop a SOAP base web service. One is called bottom-up or code first approach. With this approach, develop can write SOAP based service using annotation. The container will be able to expose the service with derived WSDL. The other approach is called Top-Down or contract first approach. Each approach has its pros and cons. The rule-of-thumb for the choice is the following:
For large enterprise applications with SOA governance, the Top-Down approach is the choice. It enforces the controlled changes, business oriented, and language neutral.
If the organization is small, and you need quick-to-market, the code-first/bottom-up approach is preferred. However, in this case, why don't you choose, RESTful?
The source code for this project has been pushed to gitHub at: https://github.com/garyliu1119/Gary-Liu-ESB.
The following is the procedures I push the code to the github:
watch the log, if there is no errors. it means the Web Service is deployed and started correctly. To verify the web service, we can enter the following URL to a browser:
Note: Different OSGi container may use different port, here I am usng 8040. And the path, services, may vary as well. The port definition is location in the file:
When you invoke the web service using the above soap xml, you should get the following response:
NOK
If you change the givenName to Claus, you will get
OK
The reason for this is in our route, we look for the giveName in the message body, if it is Claus, we return code of "OK". If you look into the camel route, this will become clear.
pom.xml
The origin of this project is from Apache Camel examples. The code has been distributed with many other ESB continers. The original route is in Java DSL. I converted that to Spring DSL.
There are few interesting points should be noted about this project. The first is the pom.xml. In this file, there is a plugin to generate java code from wsdl, name wsdl2java. You can find the detailed documentation about this utility at
The RESTful web services are become more and more popular for its simplicity, easy to develop and maintain, in comparing SOAP/wsdl. There are a lot of debases about whether to use RESTful or SOAP for web service design and enterprise integration. There is really no silver-bullet to solve all the problem with regarding to SOA. However, if you want to develop service over HTTP, which is stateless, resource oriented, then RESTful is the choice. Of course, this article is not about RESTful or SOAP. It is a tutorial on how to develop RESTful web service using Camel-cxf library and deploy the service as OSGi bundle using blueprint.
Run the above script in cygwin/Linux/MacOS, you will see a new folder created: osgi.blueprint.rs.demo. The newly created project comes with a default route which takes the following forms:
Of course, it does not do much. You may deploy this to a karaf container. For testing, I use Talend ESB container. It should work in other karaf container as well. Now, let's move on to develop RESTful web service.
Develop Web Services Using RESTful Protocol
To develop RESTful web service, we need to first update our pom.xml to include camel-cxf artifact. Then, we need to develop our service and related entities.
Update pom.xml
In order to work camel-cxf and http, we need add the following two dependencies to our pom.xml file:
I have added few java classes into my project. Here is the snapshot of the project structure.
You may download all the source code from my GitHub at https://github.com/garyliu1119/Gary-Liu-ESB/tree/master. Let me explain the service class named: CustomerService.java. This is the service class exposed as web service. Here is the list of the class:
package com.ggl.esb.osgi.rs;

import java.util.HashMap;
import java.util.Map;

import javax.ws.rs.DELETE;
import javax.ws.rs.GET;
import javax.ws.rs.POST;
import javax.ws.rs.PUT;
import javax.ws.rs.Path;
import javax.ws.rs.PathParam;
import javax.ws.rs.Produces;
import javax.ws.rs.core.Response;

import org.slf4j.Logger;
import org.slf4j.LoggerFactory;

@Path("/customerservice/")
public class CustomerService {
 private static Logger logger = LoggerFactory.getLogger(CustomerService.class);

    long currentId = 123;
    Map customers = new HashMap();
    Map orders = new HashMap();

    public CustomerService() {
        init();
    }

    @GET
    @Path("/customers/{id}/")
    @Produces("application/xml")
    public Customer getCustomer(@PathParam("id") String id) {
        logger.info("----invoking getCustomer, Customer id is: " + id);
        long idNumber = Long.parseLong(id);
        Customer c = customers.get(idNumber);
        return c;
    }

    @PUT
    @Path("/customers/")
    public Response updateCustomer(Customer customer) {
        logger.info("----invoking updateCustomer, Customer name is: " + customer.getName());
        Customer c = customers.get(customer.getId());
        Response r;
        if (c != null) {
            customers.put(customer.getId(), customer);
            r = Response.ok().build();
        } else {
            r = Response.notModified().build();
        }

        return r;
    }

    @POST
    @Path("/customers/")
    public Response addCustomer(Customer customer) {
        logger.info("----invoking addCustomer, Customer name is: " + customer.getName());
        customer.setId(++currentId);

        customers.put(customer.getId(), customer);

        return Response.ok().type("application/xml").entity(customer).build();
    }

    @DELETE
    @Path("/customers/{id}/")
    public Response deleteCustomer(@PathParam("id") String id) {
        logger.info("----invoking deleteCustomer, Customer id is: " + id);
        long idNumber = Long.parseLong(id);
        Customer c = customers.get(idNumber);

        Response r;
        if (c != null) {
            r = Response.ok().build();
            customers.remove(idNumber);
        } else {
            r = Response.notModified().build();
        }

        return r;
    }

    @GET
    @Path("/orders/{orderId}/")
    public Response getOrder(@PathParam("orderId") String orderId) {
        logger.info("----invoking getOrder, Order id is: " + orderId);
        long idNumber = Long.parseLong(orderId);
        Order order = orders.get(idNumber);
        logger.info("order id: " + order.getId());

        return Response.ok().type("application/xml").entity(order).build();
    }

    final void init() {
        Customer c = new Customer();
        c.setName("John");
        c.setId(123);
        customers.put(c.getId(), c);

        Order o = new Order();
        o.setDescription("order 223");
        o.setId(223);
        orders.put(o.getId(), o);
    }
}
As you can see, it is a POJO. Just above the class definition, we have a line:
@Path("/customerservice/")
This is the path in URI to invoke the serivce. I will explain in detail how to invoke the service. Another point to make is the path just above each mehtod, such as:
    @GET
    @Path("/customers/{id}/")
    @Produces("application/xml")
    public Customer getCustomer(@PathParam("id") String id) {
        logger.info("----invoking getCustomer, Customer id is: " + id);
        long idNumber = Long.parseLong(id);
        Customer c = customers.get(idNumber);
        return c;
    }
The above method definition indicates that when user invoke a HTTP GET method with URL of
the getorder method will be invoked. Note that the two paths we used customerservice and customers are defined at class level and method level respectively. The id is a variable passed the value of 123.
Service Defination
The Restful service is declared in the blueprint.xml file. Here is the list of the file:
The declaration of the RESTful service is as:
As you can see, it is declared with tag of . It is important to note that I had code the URL as http://localhost:19191. In practical application, this will be obtained from registration repository like ZooKeeper, WSRR, etc. Later on, when we invoke the service, this URL will be used.
Deployment to OSGi Container
Deployment is straight forward using the following command:
Check the log, make sure there is no error. To make sure the service is running using the port 19191, run the following command on cmd or cygwin terminal:
Perfect! We know now the RESTful service is runing. Let do some testing.
Test The Service
In this section, we will cover some test cases. The first one will be using the brower to do a simple check. Then, we will use curl utility to invoke POST, PUT, GET, and DELETE methods.
Use Web Browser
The first easy test is via web browser. In our web service defination, I used . Thus the URL is http://localhost:19191. Now in your web browser type the following:
Use the following commands to create new customer:
$ curl -X POST -T src/main/resources/client/add_customer.xml -H "Content-Type: text/xml" http://localhost:19191/customerservice/customers
On your terminal you should see the something like the following:
Gary Liu124
This means we added a new record with id of 124, and name of Gary Liu. The source xml file is at src/main/resources/client/add_customer.xml. The content is as the following [probably the simplest xml content:-)]:
Gary Liu
Test PUT, GET, DELETE Methods
GET
$ curl http://localhost:19191/customerservice/customers/124
Gary Liu124
PUT
$ curl -X PUT -T src/main/resources/client/update_customer.xml -H "Content-Type: text/xml" http://localhost:19191/customerservice/customers
PUT is to update customer with id 123. Now, if we retrieve the customer from browser, we should see the name is Mary now.
Now, if we try to retrieve the customer with id 123, we should not get anything.
You can also test RESTful service using google REST Console. It is very powerful tool. A lot of profession testers use this tool to test RESTful web service. It is beyond the scope of this tutorial.
Conclution
From this tutorial, we can see how simple a RESTful web service can be written, deployed and test. Most challenges for beginner of web service developer is to setup build and deployment environments. And this is the main purpose of the article.
In my recent consulting, I was asked to help to complete a task schedule in RedHat Linux environment. Here is the requirement:
The task should run every 5 minutes
If a task takes longer than 5 minutes, no new task should run while a live task is running
The task should not run between 5:30 am and 7:30 am
Solution
Apparently, this is a candidate for using Linux cron job based on the first statement. The requirement requires us to do a bit more than just cron job. I know that the second and third requirement can be done with the shell script. Thus, I decided to write a simple bash script. Of course, this can be done by using Perl as well. For now, I will provide the solution here.
The Cron Definition
The cron job definition is very simple as the following:
Linux/Unix cron job syntax can be in the following form. There are plenty references you can find in the internet. Here is the brief summary.
# * * * * *  command to execute
# ┬ ┬ ┬ ┬ ┬
# │ │ │ │ │
# │ │ │ │ │
# │ │ │ │ └───── day of week (0 - 7) (0 to 6 are Sunday to Saturday, or use names; 7 is Sunday, the same as 0)
# │ │ │ └────────── month (1 - 12)
# │ │ └─────────────── day of month (1 - 31)
# │ └──────────────────── hour (0 - 23)
# └───────────────────────── min (0 - 59)
Field name
Mandatory?
Allowed values
Allowed special characters Remarks
Minutes
Yes
0-59
* / , - -
Hours
Yes
0-23
* / , - -
Day of month
Yes
1-31
* / , - ? L W -
Month
Yes
1-12 or JAN-DEC
* / , - -
Day of week
Yes
0-6 or SUN-SAT
* / , - ? L # -
Year
No
1970–2099
* / , -
This field is not supported in standard/default implementations.
List Of The script
The complete list of the script is shown below. Line 5 - 9 is to check if a job is running. If yes, then just exit. Line 12 and 14 are to check if the time is between 5:30 am and 7:00 am.
Cron Job Log
The cron job logs are located at /var/log/cron. You need to have admin permission to view the log.
Mule and JBoss Fuse ESBs are most popular open source ESBs on the market. They are the leaders. I have been working with both for numerous years. Both of them have their strengths and weakness. I discuss these further in my later blog. Today, I am going to describe Mule 101 from development point of view. I am going to cover the following aspects:
Install Mule Studio
Install Mule MMC and Runtime
Develop Hello World Mule Application
Build Mule Project With Maven
Mule Application Deployment
Install Mule Studio
You can download both Mule Studio and MMC from http://www.mulesoft.com/platform/soa/mule-esb-enterprise. You will need to fill a form so that Mule can track you down, and hopefully you will buy their product. I downloaded the following two file to ~/Downloads on my MacBook:
As you can see the current mule run time is version 3.4.2 and Mule Studio is 3.5. Execute the following commands [My current dir is ~/Downloads]:
jar vxf mmc-distribution-mule-console-bundle-3.4.2.zip
jar vxf MuleStudio-for-macosx-64bit-3.5.0-201312091746.zip
mv MuleStudio ~/.
mv mule-enterprise-standalone-3.4.2 ~/.
Now, I have both Mule Studio and runtime under my home directory. Let's develop a Hello World Application.
Develop Hello World Mule Application
Start MuleStudio.app [Make sure it is executable]. Enable the maven setting by editing the Preferences as shown below:
To create a mule project, New -> Mule Project. Make sure create maven project as shown below:
As shown below, the MuleStudio will create a project with the following structures.
Now let's develop a simple application using HTTP component. Perform the flowing actions:
Double click the mule flow file under flow directory
Drag and drop the HTTP component
Drag and drop the Logger component
Double click the Logger icon in side the flow
Fill the groovy script as shown below
Now, we can run the mule application inside the studio by right click the the file hello-world.mflow file, run as, Muel application. You should see the following output in the studio console:
NFO  2014-02-15 14:33:05,294 [main] org.mule.module.management.agent.JmxAgent: Registered Connector Service with name Mule.hello-world:type=Connector,name="connector.http.mule.default.1"
INFO  2014-02-15 14:33:05,297 [main] org.mule.DefaultMuleContext:
**********************************************************************
* Application: hello-world                                           *
* OS encoding: US-ASCII, Mule encoding: UTF-8                        *
*                                                                    *
* Agents Running:                                                    *
*   Clustering Agent                                                 *
*   JMX Agent                                                        *
**********************************************************************
INFO  2014-02-15 14:33:05,297 [main] org.mule.module.launcher.MuleDeploymentService:
++++++++++++++++++++++++++++++++++++++++++++++++++++++++++++
+ Started app 'hello-world'                                +
++++++++++++++++++++++++++++++++++++++++++++++++++++++++++++
Open a web browser, and enter the following URL
http://localhost:8081/echo?UserName=Gary Liu
You should see the following on your browser:
/echo?UserName=Gary%20Liu
At this point, we have created a simple mule application using HTTP and Logger components coming with mule. This process is good for development and unit testing. However, we normal build the application using maven and later perform continuous integration using other utility like Jenkins. Now, let me explain the build process using maven.
Build Mule Application With Maven
In order to build maven project created through MuleStudio, we need to uncomment all the following dependencies:
One more thing before we can build using maven. Execute the folloing script under MuleStudio installation dir [~/MuleStudio]. This is to install licm jar file to our local maven repo.
Now, we can build the Hello World mule application we just developed. Let's do the following:
cd ~/MuleStudio/workspace/hello-world
mvn clean install
The maven build process takes now time. If you check the target directory, there is a file named as: hello-world-1.0.0-SNAPSHOT.zip. This is the file we will deploy to the mule runtime. If you are curious enough and wander what are the contents inside that zip file, you can do the following:
[/Users/Gary2013/MuleStudio/workspace/hello-world]$ cd target
[/Users/Gary2013/MuleStudio/workspace/hello-world/target]$ jar vtf hello-world-1.0.0-SNAPSHOT.zip
   989 Sat Feb 15 14:33:02 CST 2014 hello-world.xml
     0 Sat Feb 15 14:14:20 CST 2014 mule-app.properties
   119 Sat Feb 15 14:33:02 CST 2014 mule-deploy.properties
     0 Sat Feb 15 15:01:22 CST 2014 classes/
   989 Sat Feb 15 15:01:22 CST 2014 classes/hello-world.xml
     0 Sat Feb 15 15:01:22 CST 2014 classes/mule-app.properties
   119 Sat Feb 15 15:01:22 CST 2014 classes/mule-deploy.properties
[/Users/Gary2013/MuleStudio/workspace/hello-world/target]$
This is the beauty about mule. Its application is very clean and minimum comparing with osgi bundles. Mule will be able to figure out dynamically what jar files should be linked during runtime. Once the application zip file is build, we can deploy it to the mule runtime.
Mule Application Deployment
There is a README.txt file under mule runtime installation [in my case, it is ~/mule-enterprise-standalone-3.4.2]. In that will, the start, stop and restart procedures are described. Let's start the mule as daemon by run the following command:
[/Users/Gary2013/mule-enterprise-standalone-3.4.2]$ bin/mule start
MULE_HOME is set to /Users/Gary2013/mule-enterprise-standalone-3.4.2
Starting Mule Enterprise Edition...
[/Users/Gary2013/mule-enterprise-standalone-3.4.2]$
Now, we can check what java process is mule runtime. Here is what I see:
Mule has a feature called hot-deployment. Once the zip file is dropped to the apps dir, mule will unzip the archive, delete it, and create a file named like: hello-world-1.0.0-SNAPSHOT-anchor.txt. Inside that file, there is a line of text. The meaning of text is not important. Mule is just using it as key to monitor the application. To undeploy the application, you can simply delete the anchor file.